TrueNAS CORE is a class-leading network-attached storage system. It’s fantastic but can be overwhelming. Here’s how to get a basic setup configured and running, and how to connect to it from Ubuntu.
TrueNAS CORE
TrueNAS CORE is the successor to FreeNAS. It’s a free and open source Network-Attached Storage (NAS) application. It’s produced by iXsystems Inc. and the TrueNAS community. iXSystems produce hardware and software NAS solutions for business of all size. They have hardware solutions tailored to home and small businesses, small to medium enterprises (SMEs), and enterprise-scale units for mission-critical applications.
All of their systems use the ZFS file system. The ZFS file system is remarkably robust and to a great extent self-healing. It can store zettabytes of data, supports RAID natively, and incorporates copy-on-write. The ZFS system architects and software developers—working for the legendary Sun Microsystems—went to extraordinary lengths to guarantee the integrity of the file system and to make sure ZFS wouldn’t lose data.
TrueNAS Core is the community edition of the enterprise-class software and OS used in the commercial product offerings. You can download a TrueNAS CORE ISO image, populate a spare PC with some fast, cheap hard drives, install TrueNAS on it, and have a fully-featured, modern, professional-quality NAS for your own network.
We’re going to do just that, and also show how to connect to your TrueNAS CORE from Ubuntu.
Installing TrueNAS Core
System Requirements
You need a hard drive—mechanical or Solid State Drive (SSD)—to install the TrueNAS CORE system on, and some drives to save data on. You can’t save data to the system drive. You only get redundancy with more than one data drive, so as a minimum you really need one hard drive for the TrueNAS system and two drives for data. TrueNAS advise that these drives should use conventional magnetic recording (CMR) techology and not shingled magnetic recording (SMR) technology.
You need a minimum of 8GB RAM for TrueNAS CORE. If you’re using more than eight data drives you need an additional 1GB of RAM for each additional drive over the eight.
Get the TrueNAS CORE installation Image
Download the TrueNAS Core installation ISO image. If you’re installing TrueNAS CORE on a computer with a CD-ROM, burn the ISO image to CD. If you’re installing TrueNAS from a USB memory stick, use a tool such as Etcher to create a bootable memory stick from the ISO image.
The Installation Process
Boot from the installation media. You’ll see the installation welcome menu.
Hit “Enter” to continue. The install, reboot, or shutdown menu appears.
We’re going to install, so highlight option 1 and press “Enter.” The disk selection screen appears.
We’re installing TrueNAS CORE on the first drive. Highlight the first drive and hit “Space” to select it. Then press “Enter.” TrueNAS CORE reminds you that the drive will be wiped, and gives you chance to back out.
Highlight the “Yes” option and press “Enter.” The root password screen appears.
Type in a password for the TrueNAS CORE root user. Make sure you remember the password. You’re going to need it to log into TrueNAS CORE. You must type it twice.
Highlight the “OK” button and press “Enter.” The boot type menu will appear. You can choose to boot your TrueNAS CORE in UEFI or BIOS modes.
Select either “Boot with UEFI” or “Boot with BIOS” according to the vintage of your TrueNAS CORE computer, then press “Enter.” The installation process will start. It completes surprisingly quickly. When it has completed you’ll see the installation completed notification screen.
Press “Enter.” The install, reboot, or shutdown menu appears.
Highlight option 3, press “Enter”, and eject the installation media. The computer will reboot and start TrueNAS CORE. The first time TrueNAS CORE boots it takes longer than usual because one-time configuration steps are performed. Very shortly you’ll see the TrueNAS CORE boot menu.
Press “Enter” or wait five seconds to boot into TrueNAS CORE. Presently you’ll see the TrueNAS CORE console application.
The only thing you need to take note of here is the IP address of the web interface.
Configuring TrueNAS CORE
Enter the IP address of the TrueNAS Core computer into the browser of another computer on the same network. We’re using an Ubuntu computer. The TrueNAS Core login window appears.
Enter “root” as the username and use the password you created earlier. Once you’re authenticated and logged in, you’ll see the TrueNAS CORE dashboard.
The main display contains panels of information. They show the real-time status of your TrueNAS CORE installation. For example, here is the memory panel:
There’s a side-panel at the left-hand edge of the display. It holds a list of options. You’ll use these options to configure your TrueNAS CORE. Here’s the top of that list of options.
Notice that the name of the currently logged-in user and the network name of the TrueNAS CORE computer are shown above the options.
Setting Up a Pool
A pool is a collection of hard drives that have been added to a single virtual device. The device is treated as if it were a single drive, and the ZFS file system handles the distribution of the data across the different physical drives.
In the options list select Storage > Pools. There are no pools in the system yet.
Click the blue “Add” button at the far right of the display. You can import an existing pool or create a new pool.
We need to create a pool, so accept the defaults and click the “Create Pool” button. The “Pool Manager” window appears. You need to name your pool. We used “pool1.”
The available hard drives are listed for you. The computer we’re using has two 500 GB hard drives in it for data storage.
If you click the “Suggest Layout” button TrueNAS CORE will make a sensible choice of combination of drives, RAID, and mirroring.
In our example, it used both drives in a virtual device and mirrored them. This gives 100% redundancy because both disks are a copy of each other. Our storage capacity is (almost) 500 GB, the same as one of the mirrored drives.
Click the blue “Create” button to create our new pool. A confirmation window appears.
Click the “Confirm” checkbox and click the “Create Pool” button. The data drives are formatted to ZFS during this step. Our new pool, “pool1”, is listed in the pool list.
Creating Datasets
We’re now going to create a dataset in our pool. A dataset is a ZFS construction that behaves like a filesystem. Click the three-dotted menu button over to the far right of the “pool1” line.
Select “Add Dataset” from the drop-down menu. The “Name and Options” dialog appears.
You need to name your dataset. We’ve used “dataset1.” Enter whatever you think will be useful to you in the comment field. You can accept all the other defaults and click the blue “Submit” button at the bottom of the dialog box.
Our new dataset, “dataset1”, is listed as a child of our pool, “pool1.”
Now we’re going to create another dataset inside “dataset1.” This will be where a user called “dave” is going to store his data. Click the three-dotted menu button over to the far right of the “dataset1” line, then click “Add Dataset” in the drop-down menu.
We called our new dataset “dave-data”, added a comment, and accepted all other defaults. Click the blue “Submit” button at the bottom of the dialog box.
Our “dave-data” dataset is listed as a child of “dataset1.”
If you have several users who will use the TrueNAS Core, create more datasets—one per user—as children of “dataset1.” That way they can share the storage capacity of “dataset1” but only see their own files. We’ve only got a single user so we don’t need to create more datasets.
Creating Users
In the options list, click on Accounts > Users. The “Users” list appears. The only user listed is “root.”
Click the blue “Add” button at the far right of the display. The “Identification” dialog appears.
Complete the fields in the top half of the dialog box. You need to provide a full name and a user name. It’s convenient to use the same name as the user’s Linux account name. You can provide an email address if you like.
Provide a password, and enter it once more to verify you typed it correctly. Don’t use the same password as the user’s Linux account. Leave the “New Primary Group” checkbox selected, and scroll down to see the bottom of the “Identification” dialog.
Expand the directory tree until you find the “dave-data” dataset. This is where the user’s “home” directory will be created. There is no “/home” directory in the operating system (which is FreeBSD) because TrueNAS CORE doesn’t want you to be storing files on the OS drive.
Click the blue “Submit” button to create the user.
Sharing the User’s Dataset
For a user to send files to TrueNAS CORE they have to be able to access their dataset remotely. We’re going to accomplish that in a couple of ways. The first is going to use a Network Filing System (NFS) share.
In the options list, click on Sharing > Unix Shares (NFS). The “Sharing / NFS” list appears. There are no shares listed in it yet.
Click the blue “Add” button at the far right of the display. The “Paths” dialog appears.
Expand the directory tree until you see the “dave-data” dataset. Click the blue “Submit” button to create the share. You’re asked whether TrueNAS CORE should start the NFS service.
We’re definitely going to need that, so click the “Enable Service” button.
The new share is listed in the “Sharing / NFS” list.
Configuring Services
We need to configure the services we’re going to use to access TrueNAS CORE. For this test, we’re going to connect to TrueNAS CORE in two different ways. One of those is via the NFS share we just configured and the other is via Secure Shell (SSH).
In the options list, click on “Services.” The list of services is displayed. Scroll through it until you see the “NFS” entry.
Because we told TrueNAS CORE to start the service for us, the slider is already set to “on” for us, and is colored blue. Click on the checkbox to have the service started automatically when TrueNAS CORE boots up.
Click on the pencil icon at the end of the NFS entry line to open the “General Options” dialog.
Click the “Enable NFSv4” checkbox, then click the blue “Save” button at the bottom of the dialog. Look through the services list and locate the SSH entry.
Click the slider so that it moves to the right and turns blue, and click the checkbox so that it has a tick in it.
Setting Permissions on Datasets
We’ve created a pool of drives, added a dataset, then added another dataset for the user “dave.” We’ve created the user “dave”, and we’ve enabled the services we’re going to use to connect to TrueNAS CORE.
The step that ties this all together is setting the permissions on the user’s dataset so that they are allowed to connect to it. In the options list, click on Storage > Pools, then click on the three-dotted menu at the end of the “dave-data” list entry.
Click on the “Edit Permissions” menu entry.
Use the drop-down menus to set the “user” and “group” fields to “dave.” Make sure you click on the “Apply User” and “Apply Group” checkboxes so that they are selected.
Click the blue “Save” button.
Connecting from Ubuntu
Connecting with SSH
On the Ubuntu computer, open a terminal window and type the following command to connect to the TrueNAS CORE computer using SSH. Substitute the name of your user and the IP address of your TrueNAS CORE computer in the command:
ssh dave@192.168.1.22
You can use the network name of the TrueNAS CORE if you prefer:
ssh dave@truenas.local
Once you’ve entered your password you’ll be connected to the TrueNAS CORE computer, in your user’s home directory. The command prompt will remind you you’re in a remote session on the TrueNAS CORE computer. The directory will be empty.
ls
To disconnect, use the exit command.
exit
We’ve verified we can connect to the TrueNAS CORE computer via SSH. Let’s use SSH to send some data to the TrueNAS CORE. The rsync file syncing and backup utility uses SSH to transfer files. If you don’t have rsync installed on your computer you can install it with:
sudo apt install rsync
Here’s the rsync command we’re using.
rsync -avh /home/dave/Documents/ dave@192.168.1.22:/mnt/pool1/dataset1/dave-data
You’ll be prompted for the password of the “dave” account on the TrueNAS CORE—not your Ubuntu Linux account password—and then the file transfer takes place.
Connecting via NFS
Because we configured TrueNAS CORE to share the user’s dataset by NFS, we can mount the shared dataset on our Ubuntu computer and access it as though it were a local directory.
If you don’t already use them you’ll need to install the NFS utilities.
sudo apt install nfs-common
Now we’ll create a mount point to mount the remote dataset on.
sudo mkdir /mnt/truenas
Now we’ll mount the remote dataset:
sudo mount -t nfs 192.168.1.22:/mnt/pool1/dataset1/dave-data /mnt/truenas
When you break that command down, it isn’t as bad as it looks.
- sudo: We need root permissions to execute the
mountcommand. - mount: The
mountcommand performs the mount action for us. - -t nfs: We need to tell
mountthat we’re mounting an NFS share. We do this using the-t(type) flag. - 192.168.1.22:/mnt/pool1dataset1/dave-data: The location of the NFS network share.
- /mnt/truenas: Where we want the share to be mounted.
of course, you’ll need to use the IP address and dataset name and path that you have set up on your system. Once the NFS share has been mounted you can browse to it just like any other location on your computer.
By browsing to the mount location on your Ubuntu computer you’ll see the remote dataset just as though it were a local directory. It contains the home folder of the user “dave” and the files in “Documents” that we copied across earlier using rsync.
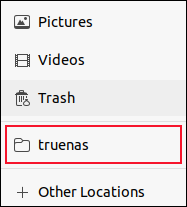
If you press “Ctrl+D” in your file browser while you’re in the mounted NFS share, it is added to your file browser list of locations as a bookmark, which is convenient.
This proves we can mount the remote dataset, and that everything is working fine. But you don’t want to have to remember to mount the share each time you use your computer. So let’s automate that.
Automatically Mounting the Shared Dataset
To have the shared dataset mounted automatically at boot time, you need to add a command to the fstab file system table file.
sudo gedit /etc/fstab
The line we need to add at the bottom of the fstab file looks like this. Make sure you use the IP address of your TrueNAS CORE, your shared dataset name, and the name of your mount point.
Also, take care to use the “Tab” key between the different parts of the command—don’t use spaces. Enter the whole command on one line, and hit “Enter” at the end to start a new line.
192.168.1.22:/mnt/pool1/dataset1/dave-data /mnt/truenas nfs defaults 0 0
Although the text has wrapped round in our screenshot, the command is actually all on one line:
Save the file and close the editor. Now, when you reboot your Ubuntu computer, your TrueNAS CORE dataset will be automatically mounted for you.
Next Steps
Congratulations, you’ve got a basic TrueNAS CORE system set up and working. We’ve only scratched the surface here. TrueNAS CORE is extremely richly-featured and there’s a lot more it can do.
Take the time to explore all the options in the sidebar option list to get an idea of what other features might be useful to you. Then—before you turn them all on—read the excellent documentation to see how to use them.
Also, consider creating an account on the TrueNAS Community forum, and benefit from the expertise of many other users.


