The post Securing Kuburnetes with StackRox appeared first on ITEnterpriser.
]]>The Outlook is Cloudy
There’s no stopping the inexorable rise of cloud computing. From the early days when it simply providing remote storage, it has brought innovation after innovation. Software-as-Service, Platform-as-a-Service, Infrastructure-as-Service, you-name-it-as-a-service. The uptake has been swift and widespread, and the impact on the traditional view of IT infrastructure has been profound.
In particular, the ability to quickly spin up preconfigured and computationally-cheap servers that are used for short tasks and then discarded has disrupted conventional thinking about the need for on-premise server hardware. On-premise hardware servers were replaced by fully-loaded cloud-hosted virtual servers. But the whole premise of remotely hosting a fully-loaded virtual machine that simply replicated the on-premise hardware it replaced is under question.
Platform-as-a-Service providers deliver OS-level virtualization. This permits containers that incorporate the software, dependencies, and configuration files required for them to be created and spun-up, auto-configured, and populated with the appropriate packages. The DevOps world talks of “cattle not pets” as a way to distinguish between the short-term commodity model of servers as containers, versus the high-maintenance, long-term investment in traditional fully-loaded servers.
Because a container-based infrastructure can scale rapidly and shrink again as demand requires, and because containers can communicate through well-defined channels, the IT estate of many organizations has become incredibly dynamic.
In particular, DevOps has embraced the cloud and containers and thrived because of it. Since DevOps was first promoted at DevOpsDay in Belgium in 2009, it has brought about a revolution in the philosophy and practices behind software development and systems administration and operations. The speed, quality, and collaborative benefits of DevOps are achieved by automating as many processes as possible. Automating code testing, workflows, and deployment is dependent on automated infrastructure. And that means containers. Lots of them.
With so many containers sitting on the critical path between coding and runtime it cries out for a management tool to monitor, control, and administer those containers. Kubernetes is just such a system. It is a container orchestration system that automates the deployment, management, scaling, and networking of containers.
That all sounds great. Now how do we make it secure?
Security for Containers and Kubernetes
As the popularity and adoption of containerization continue to grow, the need for a dedicated security system becomes more evident. Containerization makes the cloud look like a swarm of interconnected, yet independent, mini-clouds that are being created and retired on-demand, automatically.
Retro-fitting conventional security measures onto that type of environment will not give you complete cover, nor visibility into what’s happening inside your dynamic fleet of containers. Plainly, this requires a security tool designed to satisfy the unique requirements of this type of infrastructure.
StackRox is an example of this type of defensive system. Cleverly, it leverages the capabilities and core purposes of Kubernetes instead of trying to interface with the containerized environment itself. That makes StackRox agnostic as far as container technology is concerned. Kubernetes groups containers into logical units to simplify their administration, monitoring, and management. There’s no point in re-inventing the wheel, so StackRox leaves all that to Kubernetes. StackRox talks to Kubernetes, and Kubernetes talks to the containers.
StackRox lets you monitor your Kubernetes installation for attacks or threats and visually review the state of your container estate. It installs itself as a collection of lightweight services. These interwork with Kubernetes to access all the information that Kubernetes retrieves regarding the containers. Because Kubernetes has a detailed understanding of the containers during each of the building, deployment, and in-service phases, StackRox does too.
The StackRox Model
StackRox uses collections of rules and requirements called policies. It comes with a set of 66 best practice security policies. Each of these policies is a set of rules defining security or compliance requirements or restrictions. You can create your own policies to suit any special cases you may have.
StackRox is smart. For example, it can suggest the policies that you should enable according to the activities you’re involved in, or the type of containers you are configuring. Because StackRox is integrated right into Kubernetes, the Kubernetes scripts and the StackRox configurations can all be treated as code, and version controlled. It means all of your staff work from a single source of truth.
StackRox scans your Kubernetes estate for vulnerabilities with instant alerting to the nominated team members, as well as image scanning of the containers themselves. This happens from a container’s build phase through to its runtime. Non-compliant images found in the build phase are rejected, and the DevOps team is alerted through their continuous integration system or another preferred route.
In the deployment phase, security mechanisms can adjust permissions so that containers with vulnerabilities do not reach the runtime phase. Perhaps a container does not need internet access but that permission has been granted in error. That container should be restricted and a message send to the DevOps team so that they can adjust the container.
StackRox prioritizes the vulnerabilities it finds according to the level of risk and the severity of the vulnerability. This allows the corrective and remedial work to be prioritized. StackRox allows you to automate much of the remediation.
StackRox also takes into account the organization’s appetite for risk, as detailed in the security policies. Even when the container deployments are running, the scanning continues.
A Tough Nut Cracked
Security monitoring, scanning, and alerting systems often fail in cloud environments—especially fast-paced and dynamic environments that DevOps require. StackRox provides a preemptive strike by scanning the build and deployment phases of your containers, as well as the running instances. With suitable automation, it can address most vulnerabilities before the containers are deployed.
StackRox enhances the reporting in Kubernetes to provide visibility to vulnerabilities across all your running containers. StackRox delivers timely alerts and automatic incident response. It provides similar functionality for compliance requirements, with automated and on-demand validation checks to ensure regulatory directives are met and data is protected, with out-of-the-box support for CIS, NIST, PCI, HIPAA, and more.
A collection of dynamic container clusters is a serious challenge to make secure. StackRox does all the heavy lifting for you by scanning container images from creation to deployment and detecting runtime attacks using its policies of rules and restrictions, behavioral analysis, and vulnerability database.
StackRox has features that facilitate everything from auditing access to customer environments to giving you what you need to easily complete vendor security assessments. If you’re wrestling with the security concerns and compliance difficulties coming from your container estate, put StackRox on your shortlist of tools to consider.
The post Securing Kuburnetes with StackRox appeared first on ITEnterpriser.
]]>The post How to Delete a Folder From File Station on a QNAP NAS appeared first on ITEnterpriser.
]]>Deleting Shared Folders
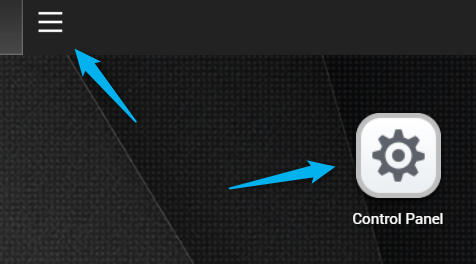
To delete a shared folder, log in to QTS and open Control Panel. You can do this by clicking the “Control Panel” app on your home screen or by clicking the hamburger menu in the top-left corner of the screen and then selecting Control Panel from the menu.
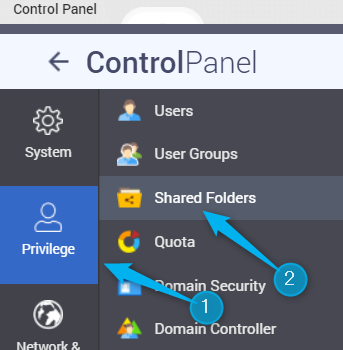
Next, click “Privilege” and then select “Shared Folders.”
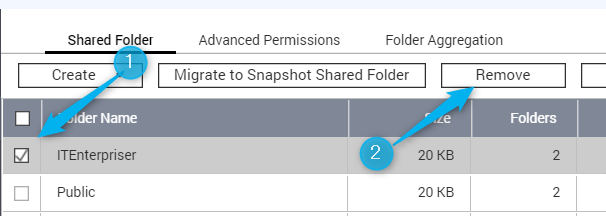
A list of your folders will appear. Click the box next to the folder you want to delete to select it. Once selected, click “Remove.”
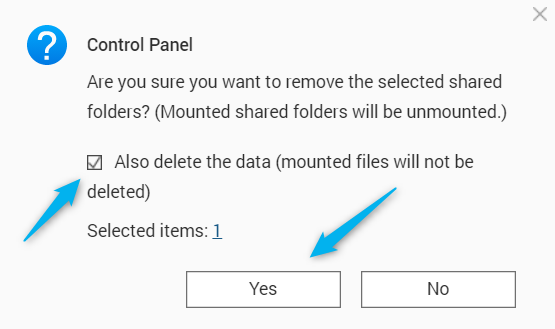
A message will appear asking if you’re sure you want to delete the shared folder. It also gives you the option of deleting the data within the folder. Check the box if you want to do that, and then click “Yes.”
The shared folder is now deleted.
Deleting Default Folders
When you configure your first volume on the NAS, it will create three folders by default–Public, Web, and homes. The Public and Web folders can’t be deleted, as they are necessary folders for QTS. However, you can delete the “homes” folder, but you’ll need to disable an option first.
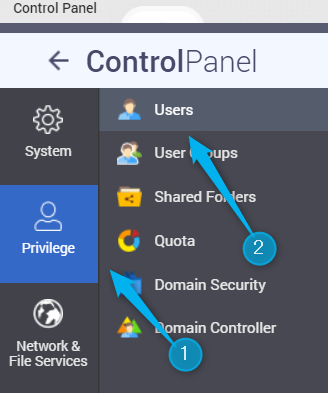
In the Control Panel, click “Privilege” and then select “Users.”
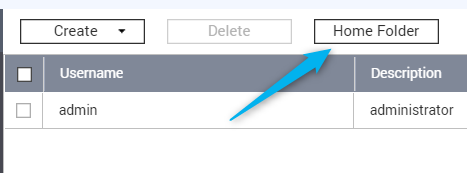
At the top of the window, click the “Home Folder” button, found next to the Create and Delete options.
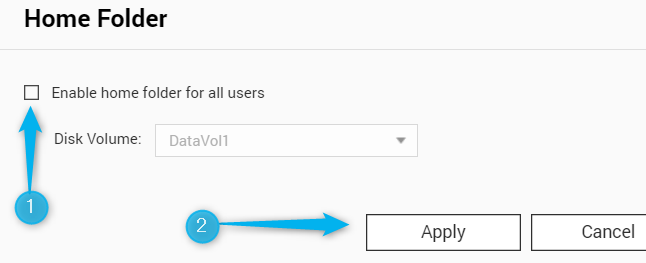
The Home Folder pop-up window will appear. Deselect the “Enable home folder for all users” option and then click “Apply.”
Next, go to “Shared Folders.” You’ll see a list of your folders. You can now check the box next to the “homes” folder. Do so, and then click “Remove” at the top of the window.
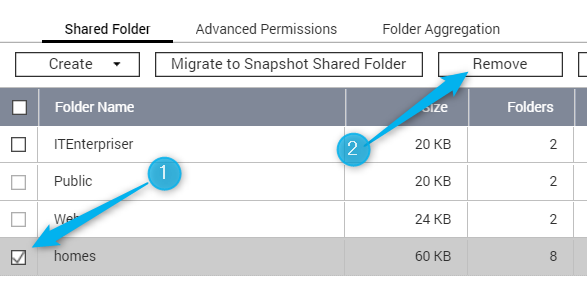
The message asking if you’re sure you want to delete the folder and accompanying data will appear. Click “Yes.” The “homes” folder will now be deleted.
The post How to Delete a Folder From File Station on a QNAP NAS appeared first on ITEnterpriser.
]]>The post ExpressVPN Review: How Does It Perform (and How to Install) on Ubuntu? appeared first on ITEnterpriser.
]]>What is VPN?
A Virtual Private Network is a fundamental part of staying safe and anonymous on the modern web. By encrypting your internet traffic and sending it through its own network of servers, a VPN prevents anyone from eavesdropping on your internet traffic and it prevents anyone tracking your traffic back to your genuine IP address. That gives you security and privacy.
It also circumvents geographic limitations. If a website or other internet service is not available to internet users from your country you can use a VPN to make it look like you’re actually located in a country where that service is permitted. As long as your VPN provider has servers in that other country, of course.
ExpressVPN has more than 3000 servers located in 160 data centers in 94 countries around the globe. It has desktop clients for Windows, Mac, and Linux. There are ExpressVPN apps for both iOS and Android. They also provide browser extensions for Chrome, Firefox, and Microsoft Edge. On paper, ExpressVPN has an impressive global infrastructure and a global spread of servers, an impressive stable of cross-platform clients, and extensions for the major browsers. But how easy is it to install and use?
We’re going to walk through what is probably the most complicated of all of the desktop installations. We’re going to install ExpressVPN on Ubuntu Linux, install the extension on the Linux version of Firefox, and see how they perform.
Installing ExpressVPN on Ubuntu
We’re using the most recent version of Ubuntu, the 21.04 Hirsute Hippo released in April 2021. We also tested the entire process on Ubuntu 20.10, the October 2020 release code-named Groovy Gorilla.
ExpressVPN is available in the usual Ubuntu program repositories, but it’s best to install the latest version from the download page on the ExpressVPN website. Use the drop-down menu to select the Ubuntu 64-bit version. The versions available are:
- Ubuntu 32-bit and 64-bit
- Fedora 32-bit and 64-bit
- Arch 64-bit
- Raspbian 32-bit
It’s good to see other Linux distributions get some attention, including Raspbian—now called Raspberry Pi OS—for the Raspberry Pi single-board computer. But we need the Ubuntu 64-bit version, so select that in the menu and then click the green “Download” button.

The “.deb” package file will be downloaded to your computer. You’ll probably find it in your Downloads directory.

You could install it by double-clicking it in your file browser. This will launch the Ubuntu software application and install it for you. Perhaps you’re installing ExpressVPN on a server with no GUI installed on it, or over an SSH connection, or you just prefer to do things the command-line way. The command you need is:
sudo dpkg -i expressvpn_3.7.0.29-1_amd64.deb

Make sure you spell the name of the file you’ve downloaded correctly. Our version of ExpressVPN was 3.7.0.29. That part of the file name will change with later versions. Helpfully, if you type the first few letters of the file name and press the “Tab” key, the rest of the file name will be completed for you.
You must activate ExpressVPN before you can use it. Activation requires an activation code. You’ll receive an activation code when you purchase a plan. At the time of writing the costs in U.S. dollars are:
- $12.95 per month, for 1 month
- $9.99 per month, for 6 months
- $8.32 per month, for 12 months
To activate your installation of ExpressVPN type:
expressvpn activate

When you’re prompted for the activation key enter the key that has been emailed to you. Note that it isn’t displayed on-screen when you type it. Because of the gobbledegook nature of the key and the difficulty you’ll have typing it sight unseen, it’s much safer to copy and paste the activation key into the terminal window. You still won’t see the key displayed in the window, but there’s no chance of mistyping it. Note that the key combination to paste into the terminal window is “Ctrl+Shift+V” not “Ctrl+V.” When you’ve pasted the activation key hit “Enter.”

If all goes well you’ll see the “Activation” confirmation. You’ll be asked whether you want to send usage reports to ExpressVPN. Press “Enter” to agree, or press “n” to opt out. You’re now ready to start using ExpressVPN.
Using ExpressVPN
The simplest way to make a VPN connection is to let ExpressVPN choose which server to connect to.
expressvpn connect

ExpressVPn establishes the connection, displays the name of the connection, and provides some help text.

In this example, it has connected the computer to an ExpessVPN server located in London. At any time you can check the status of the connection by typing:
expressvpn status

When you no longer need the VPN connection, type:
expressvpn disconnect

The VPN connection is closed and you’re returned to your normal internet access.
Connecting to a Server in a Specified Country
If you need to make your connection appear as though it originated in a specific country, pass the country on the command line. If we wish to appear as though we’re in Germany, we’d use this command:
expressvpn connect germany

The VPN connection is established using a server in Germany. To see a list of the countries in which ExpressVPN has servers, use this command. We’re piping the output into less because there’s quite a lot of it.
expressvpn list all | less

There are four columns of data in the output.

- Alias: This is the name you use if you want ExpressVPN to connect to that server.
- Country: The country in which the server is located.
- Location: The city in which the server is located.
- Recommended: Whether the server is recommended for general use. If it isn’t, you can still use it but your speed might not be as fast as it is on other servers. They’ll do in a pinch if you really need to appear as though you’re in that specific country. Generally, you’ll pick a recommended server.
Installing the Browser Extension
We’re going to install the browser extension in Mozilla Firefox because that’s the default browser in Ubuntu. The process is similar for all browsers. You can install the ExpressVPN extension through Firefox’s extensions web page, but that didn’t work for us. The only reliable method we found was to install the extension through the command line. Make sure you have ExpressVPN installed and working before you install the extension.
The command to use is:
expressvpn install-firefox-extension

This launches Firefox if it isn’t already open. It takes you to the extension installation page on the ExpressVPN website. Click the green “Get Extension” button.

The browser extension is downloaded to your computer. The page changes to allow you to install the extension. Click the blue “Add to Firefox” button.

A permission dialog appears.

Click the blue “Add” button. When the extension is installed you’ll see the ExpressVPN icon in the top-right corner of your browser window. A reminder dialog tells you that you can manage your extensions through the Firefox three-line “hamburger” menu. It also allows you to check a box if you want to use the ExpressVPN extension in Private Windows. When you’re ready to proceed, click the blue “Okay, Got It” button.

Using the Browser Extension
To use the extension, click the ExpressVPN icon in the top-right of your browser window. The extension window opens. It’ll tell you you’re not connected. The entire top half of the window is the button you use to connect and disconnect. The bottom half shows some recent connection details. What you’ll see will depend on which connections you’ve recently made. On our research machine, three locations are listed.
- Selected Location: This is the connection you’ll make if you click the connect button.
- Smart Location: This is a location chosen for speed and geographical proximity. A close fast server will give you the best performance.
- Recent Location: This is the most recent location you connected to, that wasn’t a “Smart Location.”

Clicking the button in the top half of the window connects you to the “Selected Location.” Clicking the “Recent Location” button connects you to that location. A notification appears at the top of your screen.

And the top half of the extension window turns green to show you’re connected.

A small green tick appears on the ExpressVPN icon in the top-right corner of your browser window to indicate you’re connected.

If you click the button in the extension window once more the connection is disconnected, the top half of the window returns to the reddish-orange color. You can give feedback to ExpressVPN about the quality of the connection by clicking a green thumbs up or a red thumbs down.

If you click the “Smart Location” button you’re shown a list of possible locations. Clicking one of them will connect you to that location.

How It Performed
In our tests, ExpressVPN was nothing but reliable. It connected quickly every time—within two or three seconds—and every connection was fast. We had no drop-outs or slow-downs. Of course, our tests only took place over a couple of days. If you use the service for a longer period perhaps you’ll see the occasional blip, but for us, it was plain sailing.
ExpressVPN understandably takes security seriously. ExpressVPN uses AES-256 encryption, a 4096-bit SHA-512 RSA certificate, and Hash Message Authentication Code (HMAC) to prevent modification of data in transit. They even have their own encrypted, no-logging, private Domain Name Servers on every one of their own servers.
The problem with some other VPNs is their policy and practices on logging. Some of them log so much information it pretty much negates the whole point of using a VPN. ExpressVPN is clear about what is and what isn’t logged. Nothing is logged that can identify your IP address or your browsing history.
They do log some performance information such as the dates when connections were made, which servers were connected to, and how much data has been handled by their VPN connections each day. None of this can be used to identify any of their users. And all of this has been confirmed by an independent audit conducted by PricewaterhouseCoopers.
In case you need it, the command to install the browser extension in Chrome is:
expressvpn install-chrome-extension
You can read the manual page for ExpressVPN using this command:
man expressvpn
In Summary
This is a first-class VPN. Whether you hang around the command-line or prefer to use the browser extension, you’ll find that ExpressVPN is easy to install and easy to use. Easy to install, that is if you remember to use the command line to install the browser extension. Once we’d figured that out it repeatedly installed the browser extension time and again both in Firefox and Chrome with no issues.
The sensible defaults and smart location connection capability make using ExpressVPN an absolute breeze. It’s just a little dearer than most of its direct competitors, but you get what you pay for: rock-solid performance, fast throughput, and an almost overwhelming choice of countries and locations.
You can install ExpressVPN on any number of devices with any mix of operating systems. Any five of those devices can be connected at once. The verified no-logging policy is worth the price of admission by itself.
The post ExpressVPN Review: How Does It Perform (and How to Install) on Ubuntu? appeared first on ITEnterpriser.
]]>The post Diskashur M2 Secure SSD Review: IP68, FIPS 140-2 Level 3 (soon) and a Good Performer appeared first on ITEnterpriser.
]]>Design
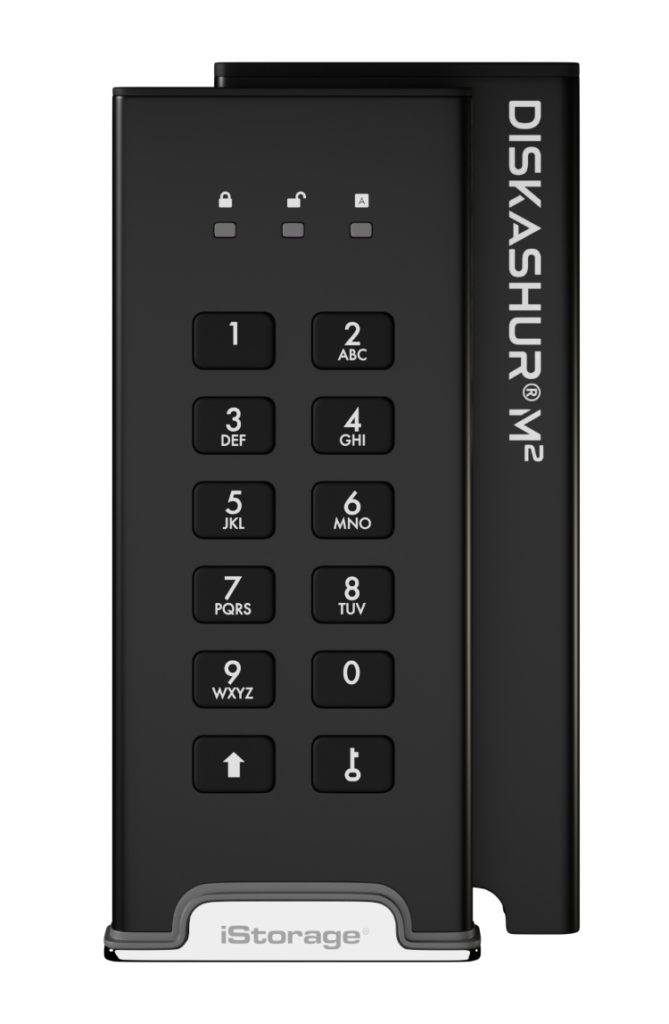
The 105mm long, 45mm wide, by 12mm thick M2’s appearance, while handsome, is rather non-descript in terms of functionality with its protective sleeve in place. Said black aluminum sleeve covers the drive up to the chromed finger-hold that you grab to remove the actual SSD from its hideaway. A rubber gasket makes for a water/dust tight seal. With both halves mated, the M2 is rated IP68 for resistance against such foreign substances.
Alas, running contrary to its otherwise innocuous appearance, there was a bold “DISKASHUR M2” logo on my review unit. So much for stealth. Never fear though, you can customize the sleeve’s tattooing to anything you want, including zilch. I recommend the latter, as the most successful security operations are those that are or were never suspected.
There’s no battery inside the M2, so you must connect the drive to a computing device to unlock it. To that end, the drive has a micro-B USB port, and the drive ships with both micro-B to Type-A and micro-B to Type-C cables. I was a tad surprised at the choice of micro-B rather than the more modern Type-C. However, because of the larger surface area and design it does tend towards a more physically secure (less likely to separate) connection than other USB connections. And indeed, the fit was quite secure in the drive I tested.
My real, albeit minor gripe is that the cables don’t sit quite flush with the drive, leaving some metal on the male side exposed. IPS68 is likely merely a distant memory with the M2’s sleeve off.
Features
The M2 is a keypad design sporting 0-9, shift (used to alter the standard numbers) and key buttons, as well as lock, unlock, and three (red, green, blue) status lights. The latter relates the state of the drive: locked, unlocked, admin, etc., and flashes when the M2 is reading or writing.
The buttons are polymer-coated to ward off visible wear that could give hints as to PINs. Regardless, a long PIN that employs as many keys as possible (and that you can remember) is recommended. I won’t relay the operational basics to you, but here’s a link to the manual. I will tell you that you can use a PIN from 7 to 15 digits in length.
Delving deeper, the M2 offers the most important security features. It uses a Common Criteria EAL 5+ (Hardware Certified) secure microprocessor featuring FIPS PUB 197 validated/AES-XTS 256-bit hardware encryption. It’s also physically sealed with the hope that it’s tamper-proof. It won’t go up in smoke Mission Impossible style (or erase the data), but you’re likely to make a mess of guts if you try to access the inner workings.
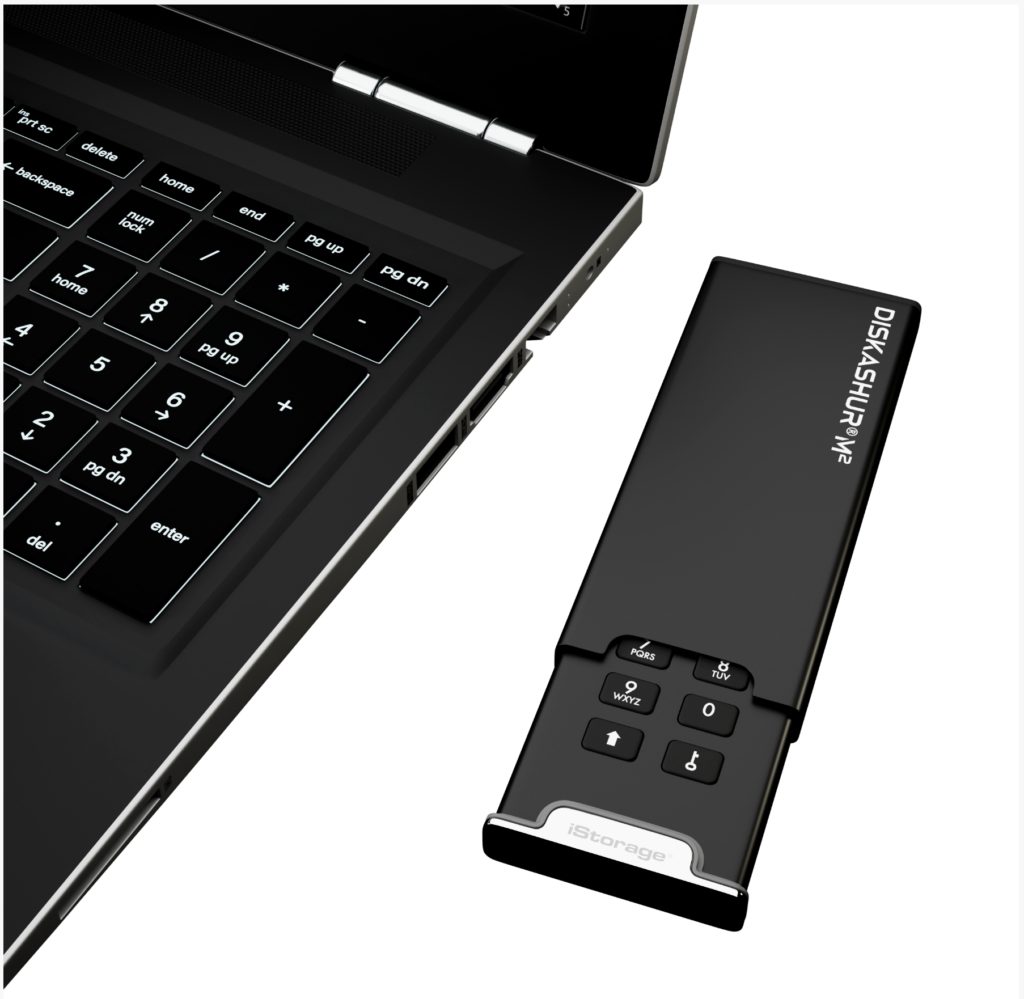
The Diskashur M2 is available in 120GB/£129, 240GB/£149, 500GB/£179, 1TB/£249, and 2TB/£429 flavors. At the time of this writing, you could multiply by about 1.4 for the price in dollars. You’re on your own for other currencies. All things considered, the M2 is decently affordable for a drive that will soon sport FIPS 140-2 Level 3 certification (pending Q4/2021) and already sports an IP68 rating.
My one caveat as to suitability task is that relying on separate cables and being attached to a device to unlock does pose certain operational considerations.
Performance
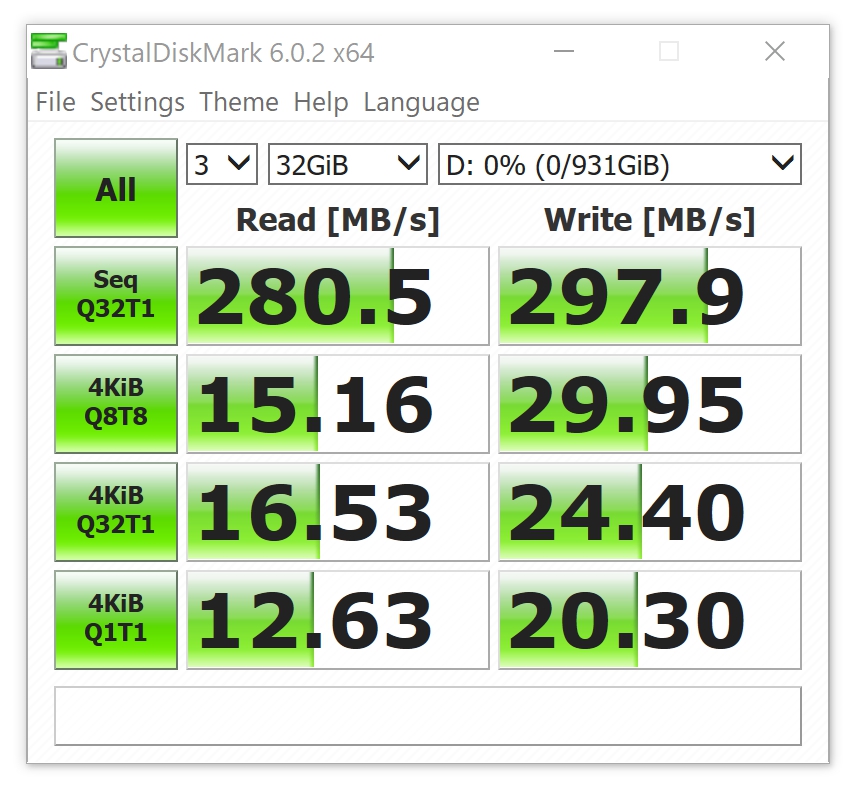
I was pleasantly surprised at the performance of the 1TB M2 that iStorage sent me. It read at a healthy 280MBps and wrote at 287MBps on my 2015 iMac’s 5Gbps USB port (Type-A).
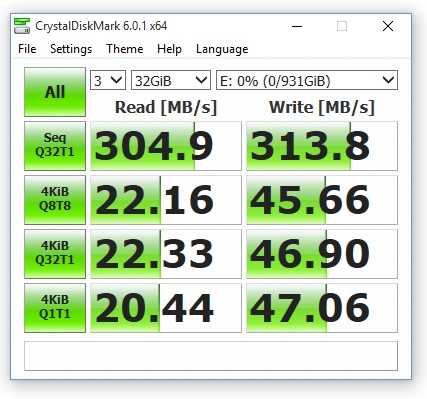
It was an even more robust performer over a 20Gbps (3.2×2) USB port at 303MBps reading and 315MBPs.
Conclusion
The Diskashur M2 has a lot going for it in basic design and functionality, as well as price and performance. It also looks good when you pull it out of the briefcase–that never hurts. You might wait for the FIPS certification if your purchasing doctrine requires it, otherwise, recommended.
The post Diskashur M2 Secure SSD Review: IP68, FIPS 140-2 Level 3 (soon) and a Good Performer appeared first on ITEnterpriser.
]]>The post Seagate IronWolf 510 Review: A Long-lived NVMe Caching SSD Specifically for NAS appeared first on ITEnterpriser.
]]>For PCs, writing this slow would be a buy-me-not issue. However, with the NAS boxes this drive is intended for, it’s not a problem. Even supposing a 10Gbps Ethernet connection, the pipe feeding NAS boxes is limited to around 1GBps. Ergo, the IronWolf 510’s sustained write speed is plenty fast enough for its intended role.
There’s a caveat concerning capacity though. The same spec table rates the 480GB IronWolf 510 for 600MBps writing and the 240GB capacity for 290MBps. Those drives could bottleneck anything less than a 10Gbps network connection.
Specs
The IronWolf 510 is a double-sided (stacked TLC/3-bit NAND on both sides) NVMe, x4 PCI 3 SSD available in 240GB, 480GB, 960GB, and 1920GB capacities. Those capacities, rather then 256GB, 512GB, etc. mean that the drives are heavily over-provisioned. I.e., there’s a lot of NAND set aside for replacing worn out blocks. Indeed, the drives are rated for 435TBW for every 240GB of capacity, roughly three times the rating of end-user drives They are also covered by a five-year warranty and a three-year data recovery plan. Nice.
Pricing is, of course, matched to the extended support and TBW ratings with the 1.92GB drive weighing in at not inconsequential $450, and the 480GB at $240 on Amazon at the time of this writing. You’re paying for peace of mind over the long haul.
Performance
I gave away most of this part of the story in the opening paragraph. As you’ll see below, the IronWolf 510 aced the read tests. They’re as good as you’ll see from a PCIe 3 SSD. The write performance on the other hand, can only be described as turtle-like. Even though there’s a DRAM on board, it’s almost as if the drive is primarily writing directly to the NAND. Slow but super steady.
For whatever the reasons, the IronWolf 510 is perfectly matched in performance to the limitations of the common NAS box. Perhaps the extra cycles are used for advance error correction.
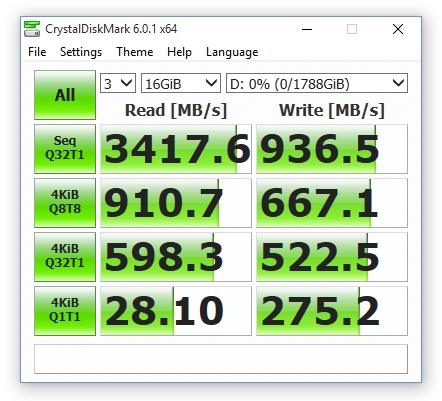
As you can see below, a long 450GB write to the IronWolf 510 hardly budges from a solid near-900MBps. The little blip at the beginning of the copy is due to data cached by Windows 10.
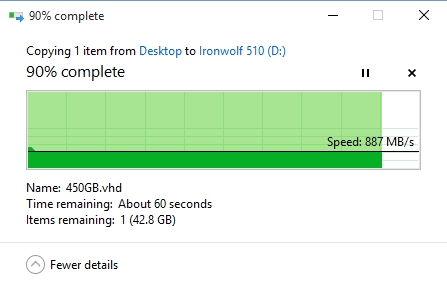
Performance testing was done on a late-generation Ryzen with 32GB of DDR4, and a Samsung 970 SSD feeding files.
Great as NAS cache
The IronWolf 510 is quite well-suited for write-few, read-many scenarios and relatively slow network pipe that is the world in which most NAS boxes live. That said, I’d steer clear of the lower capacities unless you’re using slower 2.5Gbps or 1Gbps connections. Regardless, a long-lived SSD with nice support for a NAS box seeing lots of read transactions.
The post Seagate IronWolf 510 Review: A Long-lived NVMe Caching SSD Specifically for NAS appeared first on ITEnterpriser.
]]>The post What is Whistleblowing, and How to Remain Anonymous appeared first on ITEnterpriser.
]]>Types of Whistleblowing
Whistleblowing is the common name for what is more formally called making a disclosure. It can mean bringing some wrongdoing to the attention of management within an organization, or to external authorities, or to the attention of the public via the media. in extreme cases, it can involve disclosing to the outside world of wrongdoings by a government or other ruling faction in an oppressive regime.
Not everything you may disclose will count as whistleblowing. Reporting these types of event are considered whistleblowing:
- A criminal offence, for example someone is defrauding your organization. The organization is the victim.
- An organization is breaking the law. The organization is the wrongdoer.
- Something that jeopardizes the health or safety of a person.
- Something that either puts the environment at risk or actually damages it.
- A miscarriage of justice.
- Someone is covering up a wrongdoing.
- Violations of human rights.
However, anything to do with bullying, harassment, or discrimination at work is not considered whistleblowing in most jurisdictions. The difference is important.
Whistleblowers are protected by law in many countries. In the U.S. the Whistleblower Protection Act of 1989 protects federal whistleblowers. In the United Kingdom, the Public Interest Disclosure Act 1998 provides similar protection and the “right not to suffer detriment” for whistleblowing. In Europe, the EU Whistleblower Directive protects people who report breaches of European Union law.
There are many other pieces of legislation and statutes that uphold the rights and protection of whistleblowers. The U.S. Department of Labor’s Occupational Safety and Health Administration has a Whistleblower Protection Program. It protects workers from detriment should they report a breach in any of more than 20 federal laws.
Who Do You Disclose to?
What you’re disclosing will usually dictate who you disclose it to. If it is something about a colleague you’ll probably be reporting it to a member of the management team of your organization. Many organizations have a whistleblowing process. This should outline the steps they have in place to safeguard your anonymity.
If you’re unhappy about revealing your identity because of fear of reprisals, you can report the wrongdoing anonymously. There can be an awkward balance at play here. Your organization may or may not be able to proceed with the complaint if you withhold your name, but providing your name gives rise to a risk of exposure. If you’re whistleblowing on your manager it would create an untenable situation if they later discovered who the whistleblower was.
There might be a prescribed person or body that you can disclose to anonymously. If you’re reporting an organization and not an individual, it will usually be to a prescribed body, professional body, or a trade association.
If you’re wanting to draw world attention to a breach of human rights you’ll need to approach an organization like the United Nations.
You can also whistleblow to the media to bring wrongdoings to the attention of the public and the relevant authorities. Most major media organizations have guidelines regarding anonymous sources. Online resources like WikiLeaks are also popular with whistleblowers.

The media organization will probably require your name in order to pursue the story, but you’ll be protected as an anonymous source. This is a right accorded to journalists by law in many countries and under international law. It prohibits attempts to compel them to reveal their anonymous source. This is doubly important because whistleblowing to the media waives your rights in law to protection as a whistleblower. Without anonymity—or if your anonymity is broken—you will face the possibility of reprisals.
- You might get demoted, repositioned, transferred, or lose your job altogether if you are still working at the organization in question when your identity is revealed.
- You might be seen as untrustworthy and a traitor. You might become the victim of workplace bullying.
- Other businesses in the same industry could add you to a blacklist, making future employment difficult if you choose to leave your current organization.
- You might face legal action if you break any laws to gather evidence to justify or support your whistleblowing claims. Even with the legal protection for whistleblowers, there is no protection for breaking the law.
- If you’re whistleblowing on an oppressive regime your life may be at risk.
Preserving Your Anonymity
Communicating and delivering documents anonymously isn’t as easy as you might think. Almost everything we do to communicate or transmit data leaves a trail of breadcrumbs that can lead right back to you or has a log that records what you did and when. It isn’t easy to act anonymously, but it isn’t impossible either. Knowing what type of tracking and logging exists allows you to avoid many common mistakes.
The run-of-the-mill email account isn’t anonymous. It is tied to your identity so that you can receive your email. And you have to provide information about yourself—and verify it—before you can set up most email accounts. And anyone who can access the email system logs—either through administrative capabilities or via a subpoena—can see who you have been communicating with.
However, there are free, secure, privacy-focused, and anonymous email services that you can use. ProtonMail is one of the better known. Your email is encrypted. Even ProtonMail cannot access your emails. It’s a web-based service so you don’t need to have an application installed anywhere to send or read your email.
Crucially, you can sign up for the ProtonMail service without providing any information about yourself. They do ask for some means to contact you in case you lock yourself out of your account and they need to verify it is you before they restore access to you. However, that is optional. If you don’t want to, you don’t need to provide any information about yourself at all. Just make sure you don’t forget your password.
You’ve now got an email address that is secure, encrypted, and not linked to your identity in any way. But now you have to be able to use it so that your online activity doesn’t point back to you.
Exfiltrating Data: Gathering the Evidence
There’s a great saying “computers serve their owners, not their users” and it’s good to keep that in mind. If you’re using someone else’s computer you don’t know what is being logged. It could be anything from the usual internet browser activity and system logs to a full corporate employee monitoring system. These systems can:
- Capture keystrokes.
- Detect file copy actions.
- Detect document creation, edits, and deletions.
- Detect and log, or prevent, the use of a USB memory drive.
- Take a screenshot every few seconds.
But even in the absence of employee monitoring software, you can’t trust a corporate computer, an internet cafe computer, or the computers in your library. You can’t purge and clean them to remove all traces of your activity. Router and firewall logs also track what you do. And you might well be on CCTV too.
Obviously, don’t use your work computer for whistleblowing activities, and don’t check your ProtonMail from your work desk. But the problem is, if you need to exfiltrate files that contain evidence of the wrongdoing how can you achieve that?
If you have a hard copy of the files and it is feasible, you can photocopy them. If that’s out of the question—some corporate photocopiers require an ID to identify the employee before they can be used—covertly remove the hard copies that you have. You can then scan them or photograph them at home and return the originals when you’ve finished. Don’t take them to a photocopy shop.
Trying to covertly print at work is dangerous. Large corporate printers log who has printed what and when. Some of them even keep copies of the documents that pass through them. And printing at home isn’t anonymous either if you have a color laser printer.
Many domestic color printers fingerprint pages with tiny yellow on white dots that identify the time, date, and serial number of the printer the printouts came from. If you’re considering sending a letter or a covering note with the exfiltrated documents, don’t use a color printer.
If hard copies are not a possibility and you have to gather electronic documents, you have some options. The hard part is knowing which of the possible actions is going to be detected and reported as a suspicious activity—if any. Some organizations are lax when it comes to data protection automation.
You may be able to upload files to private cloud storage such as OneDrive, Google Drive, DropBox Evernote, or an anonymous, free, file-sharing site like GoFile.
If you have administrative access to a private website you can try using a File Transfer Protocol (FTP) browser plug-in and FTP the files to the storage in the website.
Plugging a smartphone into a computer’s USB port to charge it is common practice. But smartphones can also store files, allowing data to be copied to them as though they were a USB memory drive. If USB drive access hasn’t been turned off, this might be less eye-catching than using a regular USB drive.
Emailing files is too traceable to be anything other than a dire, last-ditch option.
If you’re not going to be caught on CCTV camera, taking photographs of your screen or of the hardcopy documents is a long-winded possibility.
Dealing With Metadata
Electronic documents, especially those created with office productivity suites such as Microsoft Office contain metadata. Metadata is data that describes the document itself. It is automatically created by software applications. Metadata holds information such as:
- The name and version of the package that created the document.
- The name (or network ID) of the original author.
- The date and time when the document was created.
- The name (or network ID) of the person who last edited the documents.
- The date and time when it was last edited.
Some of that data could incriminate you.
Photographs taken with a digital camera or a smartphone contain a wealth of information about the image including when it was taken, the details of the device used to take the photograph, and the GPS coordinates of where the image was taken. If you’ve taken hardcopy documents home and photographed them the GPS location of your home is likely to encoded within the images. That will directly implicate you as the whistleblower.
Here are the number of pieces of data found in a few sample files from one of my computers. Your documents may contain even more metadata than these, depending on your device and software settings.
- 45 Metadata Fields: Microsft Word “.docx” word processing file.
- 34 Metadata Fields: Microsft Excel “.xlsx” spreadsheet file.
- 102 Metadata Fields: JPG image taken on a smartphone.

Clearly, if you are going to deliver electronic documents and images to your contact and you wish to remain anonymous you need to erase or edit the metadata. Free tools exist for this and are available for all common computing platforms. ExifTool is one of the most capable. It is free, cross-platform, and capable of working with the metadata of over 190 different file types.

ExifTool is a command-line tool, but if you’re not comfortable with the command line you can download jExifToolGUI, which is a free, cross-platform GUI for ExifTool that works on Windows, Mac, and Linux.

jExifToolGUI makes it easy to delete metadata fields that contain information that could be a clue to your identity.
Making the Disclosure
Assuming you have gathered the evidence, you need to make the disclosure. That means making contact with the party you are disclosing to. Most major newspapers and many other organizations have a means of obtaining anonymous news stories and tip-offs, using SecureDrop to provide a portal for file transfer. Because SecureDrop portals are hosted on the Dark Web you’ll need to use a Tor-enabled browser such as the Tor browser to access them.

For example, the New York Times SecureDrop portal is located at: https://nytimes.securedrop.tor.onion, and can only be accessed using a Tor-enabled browser.

The Tor anonymous network makes it virtually impossible to backtrack and find out your IP address, so you cannot be identified. If you need to communicate with an organization that doesn’t use SecureDrop you should check their website for details of how to contact them for confidential matters. Use a Virtual Private Network at the least, and a Tor-enabled browser by preference, when contacting any site for any aspect of your whistleblowing. That includes the relatively benign act of finding out what the address of their SecureDrop portal is, or looking up other contact details.
Once you’ve made contact, leave your ProtonMail or other secure email address so that they can get back to you. Once you’ve communicated back and forth for a period of time and you’re comfortable with your contact, you may choose to connect with them using Signal Messenger, a secure, private messaging service.
Signal is private, but it isn’t anonymous. If the authorities want to, they can subpoena Open Whisper Systems—the creators of Signal—and find out whether you use the service, when you joined, and when you last used it. But that’s all they can discover because that’s all that the Signal services stores about you. No one can determine with whom you have communicated, or about what. If you want to have voice calls with your contact do it from your home, and use Signal’s voice call capability.
If you want to have the strongest possible protection for your online anonymity, use Tails. Tails is an operating system that sits on a USB memory stick or CD. You boot your computer using the image on the memory stick or CD, and it runs a privacy-focused minimalist Linux based on Debian. It already has the Tor browser installed for you.
You can check your secure mail, access secure portals, and do whatever you need to. When you shut down, remove the memory stick or CD and you can boot your computer back up as normal, into its usual operating system. Nothing on your computer will have any traces of what you’ve done. And Tails is an amnesiac operating system. It doesn’t track anything you do.
If you want to go a step further use public Wi-Fi, and Tails. But remember that many places have CCTV, including public transport, and that you should leave your smartphone at home because of its geolocational tracking. That can be used to place you at a location at a particular time which could be cross-referenced with the Wi-Fi router logs looking for encrypted or Tor connections. That could be enough to incriminate you.
If you’re going to post hardcopy files to your contact, use a post office that is outside your normal area and pay by cash. You need to avoid tying a payment card to a record of postage. Make sure there is nothing incriminating on the outside of the envelope or packaging. Every single item that is handled by the U.S. postal service is photographed. You should assume other countries have similar programs.
It’s Difficult, But Possible
Take all the defensive steps you can. Don’t just turn on incognito mode and hope for the best.
The post What is Whistleblowing, and How to Remain Anonymous appeared first on ITEnterpriser.
]]>The post How to Set Up and Get Started with a QNAP NAS appeared first on ITEnterpriser.
]]>What Is a QNAP NAS?
Network-attached storage (NAS) is a device designed for data storage that generally offers additional functionality. QNAP, founded in 2000, is a company that specializes in the manufacturing of NAS servers, network switches, and various other storage and networking hardware/software.
QNAP provides a NAS solution for everyone–from power users to small businesses to the enterprise. The current selection of NAS ranges in size from 1-bay all the way up to 30-bays, and come in set-top design, tower, and rackmount form factors.
Each QNAP NAS comes with a proprietary operating system depending on which type of NAS you purchased.
- QTS: Linux-based operating system.
- QuTS hero: Combines the app-based QTS with a 128-bit ZFS file system.
- QES: QNAP’s enterprise operating system based on FreeBSD and utilizes the ZFS file system.
The model we’ll be using in this setup process is the QNAP TS-453D NAS, which sports a tower form factor and the QTS operating system.
The Physical Setup of the QNAP NAS
The NAS will arrive with different items depending on which type of NAS you bought. At the very minimum it should arrive with a power cable, an Ethernet cable, some screws to mount the drives to the drive trays, a warranty card, an installation guide, and, of course, the NAS itself.
Most of the time, the NAS will be barebone–meaning it comes without the hard drives. The first thing you’ll need to do is check QNAP’s compatibility list to learn which drives are actually tested and recommended by QNAP for your model.
When it comes to deciding which size drives to purchase, you’ll need to make a decision on how much space you want for actual storage, and how much you want to use for redundancy. Depending on how many drive bays your NAS comes with will determine which RAID types are available. For example, if you have a 2-bay NAS, you can choose between JBOD, RAID 0, and RAID 1. We’ve developed a RAID calculator to help you determine how much available, redundant, and unused storage space you’ll have for your selected RAID type and drive capacity.
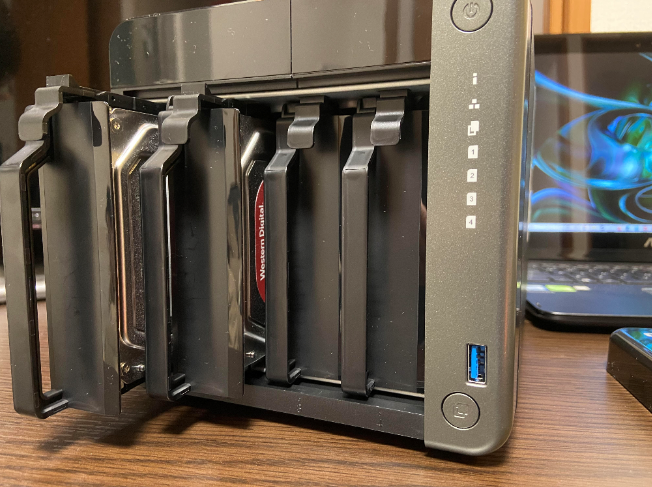
Once you have your drives, it’s time to install them. Our NAS (TS-453D) has a cover over the drive bays that slides off but, depending on your model, the instructions for removing the cover may be slightly different, or you may not even have a cover. If you have a sliding cover, push down the lock switch on the side of the NAS to unlock the cover and then slide the cover off.
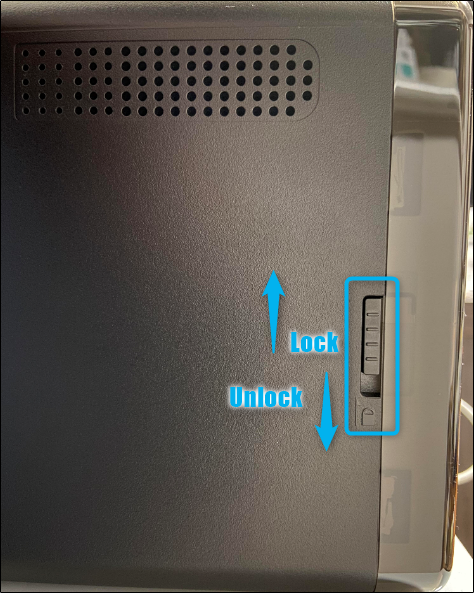
Once you’ve removed the cover, gently pull the trays out. You’ll notice a clip on each side of the tray, which are a part of QNAP’s screwless design. Remove the clips on each side of the tray, place the drive inside, and then add the clips back. To further reinforce the drives, you can add the screws, though this isn’t necessary. However, you’ll need to use the screws if you’re using a 2.5″ drive.
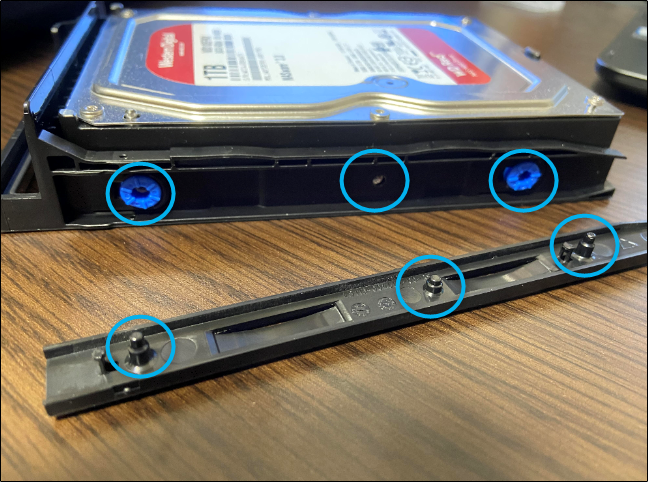
With the drives securely fastened in the trays, slide them back into the NAS.
On the back of the NAS, you’ll find at least one ethernet port and the DC IN power port.
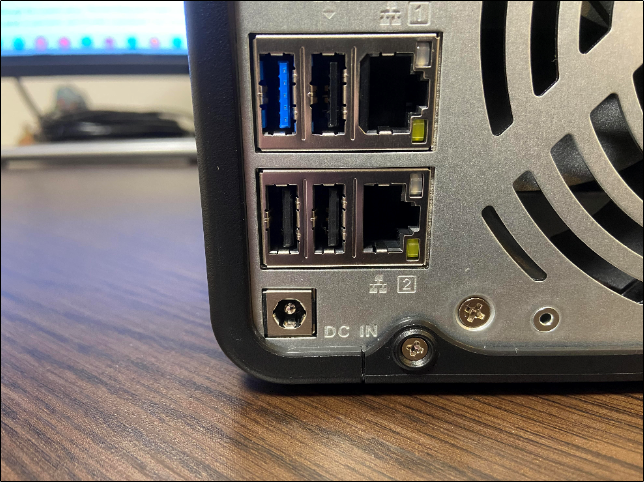
Plug the NAS up to a power source and connect it to your local network with one of the provided Ethernet cables, and you’re good to go.
Configuring the QNAP NAS
Once you’ve set up the physical aspects of your NAS, turn it on and find the NAS on your local network using Qfinder Pro. When you download and open Qfinder Pro, it should automatically locate your NAS and recognize that it hasn’t been initialized yet. The Smart Installation Guide window will ask you if you want it to guide you through the configuration process. Click “Yes.”
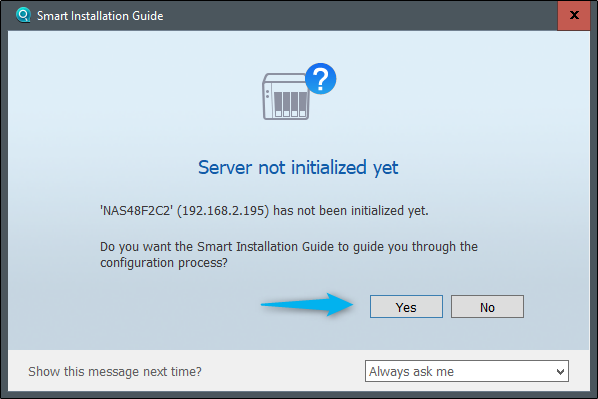
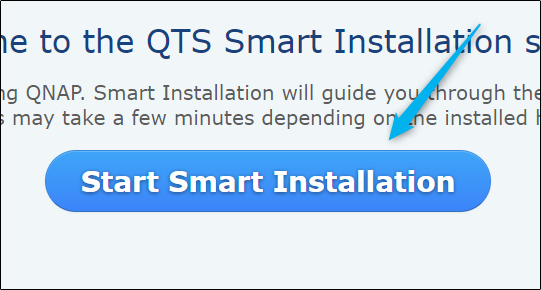
The QTS Smart Installation system will open in your default browser. To get started, click “Start Smart Installation.”
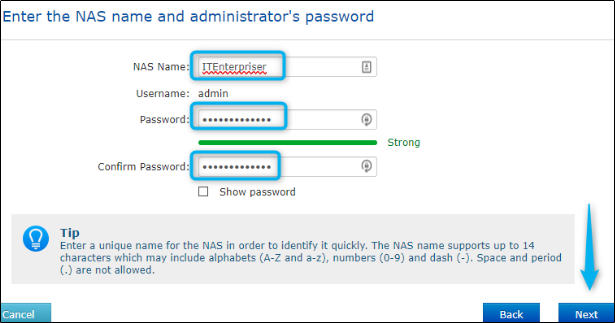
On the first page of the installation guide, you’ll need to give your NAS a name (which will also appear on your network) and the admin password. The NAS name supports up to 14 uppercase and lowercase letters, numbers, and dashes. The password can be up to 64 characters, and supports uppercase and lowercase letters, numbers, and special characters. The password must be at least 8 characters long, but we recommend making it as strong as possible.
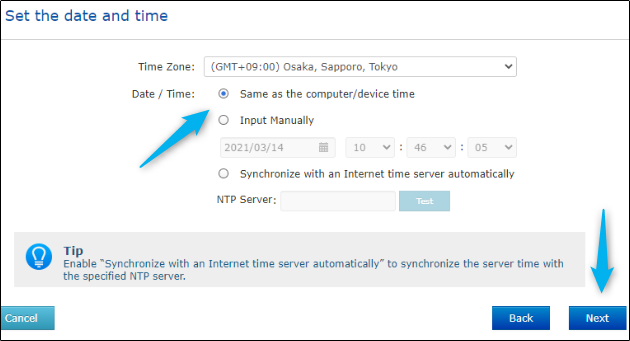
On the next screen, you need to set the date and time. You can choose which time zone you’re in, use the same date/time as your computer, input it the information manually, or automatically sync with an Internet time server.
Click “Next” when you’ve set things up.
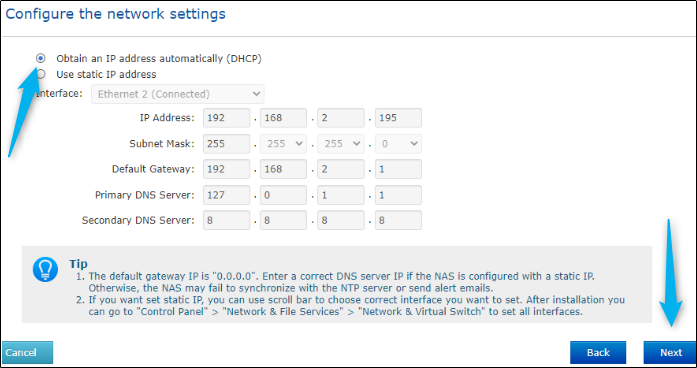
Next, configure the network settings. Automatically obtaining an IP address is the quickest route, but you can also use a static IP address.
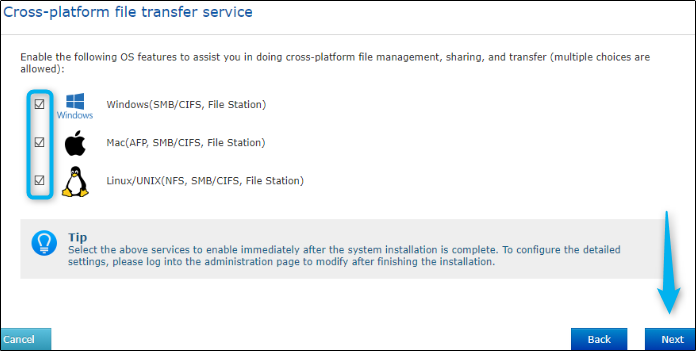
Finally, enable the OS features you want to use for cross-platform file management, sharing, and transferring. You can select more than one option.
The NAS will begin getting things set up, which could take a few minutes. Once ready, the Help Center will appear on the QTS interface, providing a few resources to get you started with your new NAS.
A Brief Overview of QTS
QTS is QNAP’s sophisticated operating system. It’s stable, provides a polished desktop-like interface, and offers a large library of apps, layering additional functionality on your NAS, making it much more than just a storage device.
QNAP supports all the usual NAS options like shared folders, users, user groups, iSCSI, Telnet/SSH, Active directory, Time Machine, AFS/SMB/NFS, and more. QNAP also provides its own web portal-based remote access, plus remote access, multimedia, and sync clients for Windows, macOS, Linux, iOS, and Android.
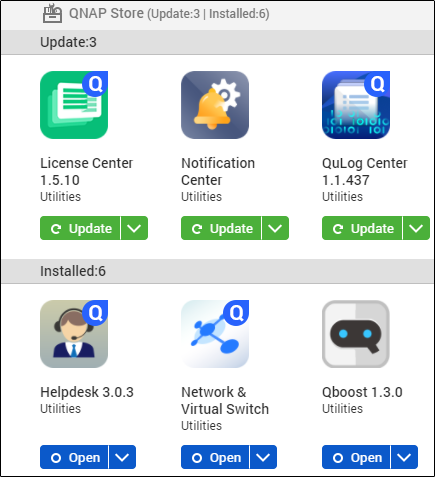
QNAP’s App Center is where you can install, remove, and update apps. QTS will let you know when an application is ready to be updated.
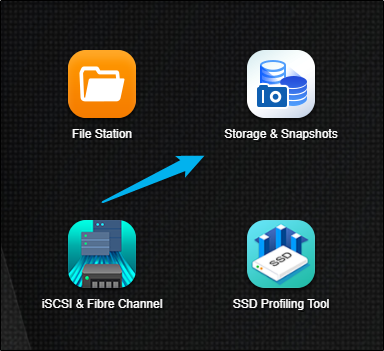
The Storage & Snapshots app is where you’ll manage disks, storage space, and other storage features. To get started using your NAS, you’ll need to create a storage pool and volume. This app is already installed by default.
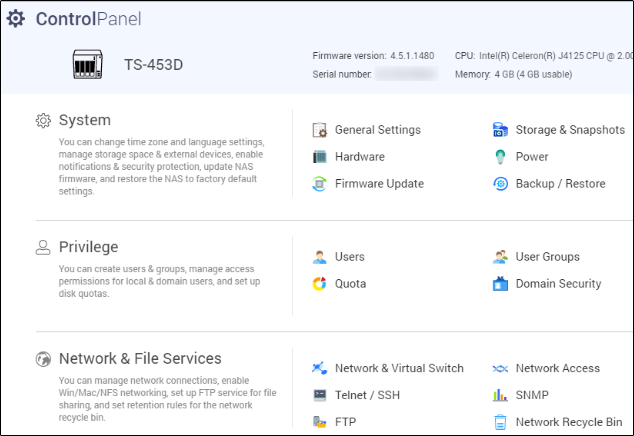
The Control Panel is where you can change system setting, create users and groups (and manage access permissions), manage network connections and file services, and much more.
QNAP even provides a friendly robot (Qboost) that lets you analyze system performance.

Now that you’ve got your QNAP NAS set up and initialized, go familiarize yourself with QTS, explore its installed apps (and apps you can install in App Center), and read up on the Help Center documentation to help you continue your journey with QNAP.
The post How to Set Up and Get Started with a QNAP NAS appeared first on ITEnterpriser.
]]>The post How to Set Up TrueNAS CORE and Connect to it From Ubuntu appeared first on ITEnterpriser.
]]>TrueNAS CORE
TrueNAS CORE is the successor to FreeNAS. It’s a free and open source Network-Attached Storage (NAS) application. It’s produced by iXsystems Inc. and the TrueNAS community. iXSystems produce hardware and software NAS solutions for business of all size. They have hardware solutions tailored to home and small businesses, small to medium enterprises (SMEs), and enterprise-scale units for mission-critical applications.
All of their systems use the ZFS file system. The ZFS file system is remarkably robust and to a great extent self-healing. It can store zettabytes of data, supports RAID natively, and incorporates copy-on-write. The ZFS system architects and software developers—working for the legendary Sun Microsystems—went to extraordinary lengths to guarantee the integrity of the file system and to make sure ZFS wouldn’t lose data.
TrueNAS Core is the community edition of the enterprise-class software and OS used in the commercial product offerings. You can download a TrueNAS CORE ISO image, populate a spare PC with some fast, cheap hard drives, install TrueNAS on it, and have a fully-featured, modern, professional-quality NAS for your own network.
We’re going to do just that, and also show how to connect to your TrueNAS CORE from Ubuntu.
Installing TrueNAS Core
System Requirements
You need a hard drive—mechanical or Solid State Drive (SSD)—to install the TrueNAS CORE system on, and some drives to save data on. You can’t save data to the system drive. You only get redundancy with more than one data drive, so as a minimum you really need one hard drive for the TrueNAS system and two drives for data. TrueNAS advise that these drives should use conventional magnetic recording (CMR) techology and not shingled magnetic recording (SMR) technology.
You need a minimum of 8GB RAM for TrueNAS CORE. If you’re using more than eight data drives you need an additional 1GB of RAM for each additional drive over the eight.
Get the TrueNAS CORE installation Image
Download the TrueNAS Core installation ISO image. If you’re installing TrueNAS CORE on a computer with a CD-ROM, burn the ISO image to CD. If you’re installing TrueNAS from a USB memory stick, use a tool such as Etcher to create a bootable memory stick from the ISO image.
The Installation Process
Boot from the installation media. You’ll see the installation welcome menu.

Hit “Enter” to continue. The install, reboot, or shutdown menu appears.

We’re going to install, so highlight option 1 and press “Enter.” The disk selection screen appears.

We’re installing TrueNAS CORE on the first drive. Highlight the first drive and hit “Space” to select it. Then press “Enter.” TrueNAS CORE reminds you that the drive will be wiped, and gives you chance to back out.

Highlight the “Yes” option and press “Enter.” The root password screen appears.

Type in a password for the TrueNAS CORE root user. Make sure you remember the password. You’re going to need it to log into TrueNAS CORE. You must type it twice.
Highlight the “OK” button and press “Enter.” The boot type menu will appear. You can choose to boot your TrueNAS CORE in UEFI or BIOS modes.

Select either “Boot with UEFI” or “Boot with BIOS” according to the vintage of your TrueNAS CORE computer, then press “Enter.” The installation process will start. It completes surprisingly quickly. When it has completed you’ll see the installation completed notification screen.

Press “Enter.” The install, reboot, or shutdown menu appears.

Highlight option 3, press “Enter”, and eject the installation media. The computer will reboot and start TrueNAS CORE. The first time TrueNAS CORE boots it takes longer than usual because one-time configuration steps are performed. Very shortly you’ll see the TrueNAS CORE boot menu.

Press “Enter” or wait five seconds to boot into TrueNAS CORE. Presently you’ll see the TrueNAS CORE console application.

The only thing you need to take note of here is the IP address of the web interface.
Configuring TrueNAS CORE
Enter the IP address of the TrueNAS Core computer into the browser of another computer on the same network. We’re using an Ubuntu computer. The TrueNAS Core login window appears.

Enter “root” as the username and use the password you created earlier. Once you’re authenticated and logged in, you’ll see the TrueNAS CORE dashboard.

The main display contains panels of information. They show the real-time status of your TrueNAS CORE installation. For example, here is the memory panel:

There’s a side-panel at the left-hand edge of the display. It holds a list of options. You’ll use these options to configure your TrueNAS CORE. Here’s the top of that list of options.

Notice that the name of the currently logged-in user and the network name of the TrueNAS CORE computer are shown above the options.
Setting Up a Pool
A pool is a collection of hard drives that have been added to a single virtual device. The device is treated as if it were a single drive, and the ZFS file system handles the distribution of the data across the different physical drives.
In the options list select Storage > Pools. There are no pools in the system yet.

Click the blue “Add” button at the far right of the display. You can import an existing pool or create a new pool.

We need to create a pool, so accept the defaults and click the “Create Pool” button. The “Pool Manager” window appears. You need to name your pool. We used “pool1.”
The available hard drives are listed for you. The computer we’re using has two 500 GB hard drives in it for data storage.

If you click the “Suggest Layout” button TrueNAS CORE will make a sensible choice of combination of drives, RAID, and mirroring.

In our example, it used both drives in a virtual device and mirrored them. This gives 100% redundancy because both disks are a copy of each other. Our storage capacity is (almost) 500 GB, the same as one of the mirrored drives.
Click the blue “Create” button to create our new pool. A confirmation window appears.

Click the “Confirm” checkbox and click the “Create Pool” button. The data drives are formatted to ZFS during this step. Our new pool, “pool1”, is listed in the pool list.

Creating Datasets
We’re now going to create a dataset in our pool. A dataset is a ZFS construction that behaves like a filesystem. Click the three-dotted menu button over to the far right of the “pool1” line.

Select “Add Dataset” from the drop-down menu. The “Name and Options” dialog appears.

You need to name your dataset. We’ve used “dataset1.” Enter whatever you think will be useful to you in the comment field. You can accept all the other defaults and click the blue “Submit” button at the bottom of the dialog box.

Our new dataset, “dataset1”, is listed as a child of our pool, “pool1.”
Now we’re going to create another dataset inside “dataset1.” This will be where a user called “dave” is going to store his data. Click the three-dotted menu button over to the far right of the “dataset1” line, then click “Add Dataset” in the drop-down menu.

We called our new dataset “dave-data”, added a comment, and accepted all other defaults. Click the blue “Submit” button at the bottom of the dialog box.

Our “dave-data” dataset is listed as a child of “dataset1.”
If you have several users who will use the TrueNAS Core, create more datasets—one per user—as children of “dataset1.” That way they can share the storage capacity of “dataset1” but only see their own files. We’ve only got a single user so we don’t need to create more datasets.
Creating Users
In the options list, click on Accounts > Users. The “Users” list appears. The only user listed is “root.”

Click the blue “Add” button at the far right of the display. The “Identification” dialog appears.

Complete the fields in the top half of the dialog box. You need to provide a full name and a user name. It’s convenient to use the same name as the user’s Linux account name. You can provide an email address if you like.
Provide a password, and enter it once more to verify you typed it correctly. Don’t use the same password as the user’s Linux account. Leave the “New Primary Group” checkbox selected, and scroll down to see the bottom of the “Identification” dialog.

Expand the directory tree until you find the “dave-data” dataset. This is where the user’s “home” directory will be created. There is no “/home” directory in the operating system (which is FreeBSD) because TrueNAS CORE doesn’t want you to be storing files on the OS drive.
Click the blue “Submit” button to create the user.

Sharing the User’s Dataset
For a user to send files to TrueNAS CORE they have to be able to access their dataset remotely. We’re going to accomplish that in a couple of ways. The first is going to use a Network Filing System (NFS) share.
In the options list, click on Sharing > Unix Shares (NFS). The “Sharing / NFS” list appears. There are no shares listed in it yet.

Click the blue “Add” button at the far right of the display. The “Paths” dialog appears.

Expand the directory tree until you see the “dave-data” dataset. Click the blue “Submit” button to create the share. You’re asked whether TrueNAS CORE should start the NFS service.

We’re definitely going to need that, so click the “Enable Service” button.
The new share is listed in the “Sharing / NFS” list.

Configuring Services
We need to configure the services we’re going to use to access TrueNAS CORE. For this test, we’re going to connect to TrueNAS CORE in two different ways. One of those is via the NFS share we just configured and the other is via Secure Shell (SSH).
In the options list, click on “Services.” The list of services is displayed. Scroll through it until you see the “NFS” entry.

Because we told TrueNAS CORE to start the service for us, the slider is already set to “on” for us, and is colored blue. Click on the checkbox to have the service started automatically when TrueNAS CORE boots up.
Click on the pencil icon at the end of the NFS entry line to open the “General Options” dialog.

Click the “Enable NFSv4” checkbox, then click the blue “Save” button at the bottom of the dialog. Look through the services list and locate the SSH entry.

Click the slider so that it moves to the right and turns blue, and click the checkbox so that it has a tick in it.
Setting Permissions on Datasets
We’ve created a pool of drives, added a dataset, then added another dataset for the user “dave.” We’ve created the user “dave”, and we’ve enabled the services we’re going to use to connect to TrueNAS CORE.
The step that ties this all together is setting the permissions on the user’s dataset so that they are allowed to connect to it. In the options list, click on Storage > Pools, then click on the three-dotted menu at the end of the “dave-data” list entry.

Click on the “Edit Permissions” menu entry.

Use the drop-down menus to set the “user” and “group” fields to “dave.” Make sure you click on the “Apply User” and “Apply Group” checkboxes so that they are selected.

Click the blue “Save” button.
Connecting from Ubuntu
Connecting with SSH
On the Ubuntu computer, open a terminal window and type the following command to connect to the TrueNAS CORE computer using SSH. Substitute the name of your user and the IP address of your TrueNAS CORE computer in the command:
ssh dave@192.168.1.22

You can use the network name of the TrueNAS CORE if you prefer:
ssh dave@truenas.local

Once you’ve entered your password you’ll be connected to the TrueNAS CORE computer, in your user’s home directory. The command prompt will remind you you’re in a remote session on the TrueNAS CORE computer. The directory will be empty.
ls

To disconnect, use the exit command.
exit
We’ve verified we can connect to the TrueNAS CORE computer via SSH. Let’s use SSH to send some data to the TrueNAS CORE. The rsync file syncing and backup utility uses SSH to transfer files. If you don’t have rsync installed on your computer you can install it with:
sudo apt install rsync

Here’s the rsync command we’re using.
rsync -avh /home/dave/Documents/ dave@192.168.1.22:/mnt/pool1/dataset1/dave-data

You’ll be prompted for the password of the “dave” account on the TrueNAS CORE—not your Ubuntu Linux account password—and then the file transfer takes place.

Connecting via NFS
Because we configured TrueNAS CORE to share the user’s dataset by NFS, we can mount the shared dataset on our Ubuntu computer and access it as though it were a local directory.
If you don’t already use them you’ll need to install the NFS utilities.
sudo apt install nfs-common

Now we’ll create a mount point to mount the remote dataset on.
sudo mkdir /mnt/truenas

Now we’ll mount the remote dataset:
sudo mount -t nfs 192.168.1.22:/mnt/pool1/dataset1/dave-data /mnt/truenas

When you break that command down, it isn’t as bad as it looks.
- sudo: We need root permissions to execute the
mountcommand. - mount: The
mountcommand performs the mount action for us. - -t nfs: We need to tell
mountthat we’re mounting an NFS share. We do this using the-t(type) flag. - 192.168.1.22:/mnt/pool1dataset1/dave-data: The location of the NFS network share.
- /mnt/truenas: Where we want the share to be mounted.
of course, you’ll need to use the IP address and dataset name and path that you have set up on your system. Once the NFS share has been mounted you can browse to it just like any other location on your computer.

By browsing to the mount location on your Ubuntu computer you’ll see the remote dataset just as though it were a local directory. It contains the home folder of the user “dave” and the files in “Documents” that we copied across earlier using rsync.
If you press “Ctrl+D” in your file browser while you’re in the mounted NFS share, it is added to your file browser list of locations as a bookmark, which is convenient.
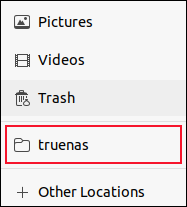
This proves we can mount the remote dataset, and that everything is working fine. But you don’t want to have to remember to mount the share each time you use your computer. So let’s automate that.
Automatically Mounting the Shared Dataset
To have the shared dataset mounted automatically at boot time, you need to add a command to the fstab file system table file.
sudo gedit /etc/fstab

The line we need to add at the bottom of the fstab file looks like this. Make sure you use the IP address of your TrueNAS CORE, your shared dataset name, and the name of your mount point.
Also, take care to use the “Tab” key between the different parts of the command—don’t use spaces. Enter the whole command on one line, and hit “Enter” at the end to start a new line.
192.168.1.22:/mnt/pool1/dataset1/dave-data /mnt/truenas nfs defaults 0 0
Although the text has wrapped round in our screenshot, the command is actually all on one line:

Save the file and close the editor. Now, when you reboot your Ubuntu computer, your TrueNAS CORE dataset will be automatically mounted for you.
Next Steps
Congratulations, you’ve got a basic TrueNAS CORE system set up and working. We’ve only scratched the surface here. TrueNAS CORE is extremely richly-featured and there’s a lot more it can do.
Take the time to explore all the options in the sidebar option list to get an idea of what other features might be useful to you. Then—before you turn them all on—read the excellent documentation to see how to use them.
Also, consider creating an account on the TrueNAS Community forum, and benefit from the expertise of many other users.
The post How to Set Up TrueNAS CORE and Connect to it From Ubuntu appeared first on ITEnterpriser.
]]>The post TrueNAS vs. FreeNAS: What is the Difference? appeared first on ITEnterpriser.
]]>As of October 2020, the openly developed, cutting edge FreeNAS became TrueNAS CORE; TrueNas, the in-house dual-node variant developed by curator iXsystems for their own hardware and business use became TrueNAS Enterprise; and a third multi-node variant, TrueNAS SCALE, was added.
Additionally, on same date, the two existing projects plus SCALE were folded into a single unified project rather than existing as two separate projects. They’re all still based on FreeBSD and OpenZFS, and all three are curated by iXsystems.
Why the Name Change?
The parade of name changes likely stemmed from the “Free” in FreeNAS Pro, which was the original name for what became the iXsystems-developed business version. Being available only when you bought the company’s hardware, some might have interpreted the moniker as a bit disingenuous. That explains the lofty title of TrueNAS.
But why TrueNAS CORE rather than FreeNAS, which is still free? First, there’s the whole kissing cousin NAS operating systems that sounded like competitors. Then, there’s the aforementioned convergence of the development into one project. Also, according to iXsystems, there is a perception among some that anything free has to be inferior.
From my own experience, I can tell you that despite the fact that much of the world runs on free operating systems (Linux, FreeBSD, etc.) or variants thereof (Android, macOS, etc.) some business types just aren’t comfortable with the word “free”. Unless of course it’s leveraging that free stuff under their own branding.
You probably noticed that CORE is all caps. It’s an acronym, of course. In this case, Community supported, Open Source, Rapid development, and Early availability. Descriptive, and of course, all-CAPS jumps out on the page.
Variants in Detail
TrueNAS CORE is the single-node version of the NAS OS which is dedicated to experimentation, adding and developing new features, and generally pushing the envelope. It’s also the one most end-users will want to download and play with.
TrueNAS Enterprise, despite not having a sexy acronym in its name, offers quite a few perquisites for business users seeking stability and maximum up time. That includes dual nodes via redundant controllers, fiber channel support, KMIP, and certifications for VMware, Veeam, Citrix etc. Free support is included, but you can upgrade that with a variety of pay options.
TrueNAS SCALE is an acronym for Scale-Out ZFS, Converged storage and compute,
Active-Active operation, Linux Containers, and Easy to manage. That’s shouting quite a mouthful, but the company makes its point. The point being that this version is multi-node and can scale out, that is, allow you to add more hardware to the mix, not just replace and upgrade (upscale).
Like CORE, SCALE is free and downloadable. Also like CORE, there’s a community involved in development.
To summarize…
- FreeNAS — no longer exists except as a popular name and a website steering you to TrueNAS.
- TrueNAS CORE — the former FreeNAS, single-node, and dedicated to pushing the development and feature envelope.
- TrueNAS Enterprise — the former TrueNAS, available only on iXsystems hardware. Dual node and focused on up time/reliability for business and corporate use.
- TrueNAS SCALE — Like CORE, freely available, but multi-node to allow scaling out of hardware, i.e., adding new hardware and nodes, rather than just expanding the existing hardware.

Related: FreeNAS vs UNRAID: What are the Differences?
The post TrueNAS vs. FreeNAS: What is the Difference? appeared first on ITEnterpriser.
]]>