The post How to Delete a Folder From File Station on a QNAP NAS appeared first on ITEnterpriser.
]]>Deleting Shared Folders
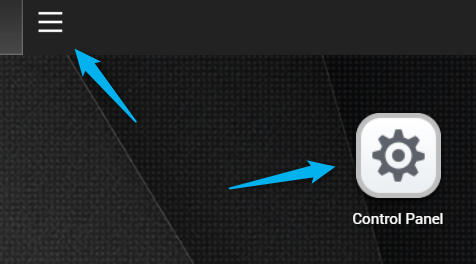
To delete a shared folder, log in to QTS and open Control Panel. You can do this by clicking the “Control Panel” app on your home screen or by clicking the hamburger menu in the top-left corner of the screen and then selecting Control Panel from the menu.
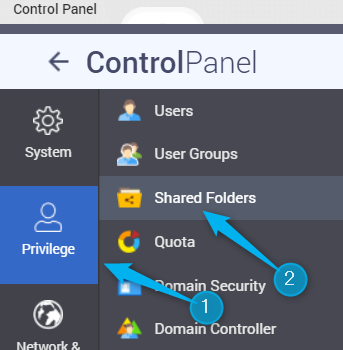
Next, click “Privilege” and then select “Shared Folders.”
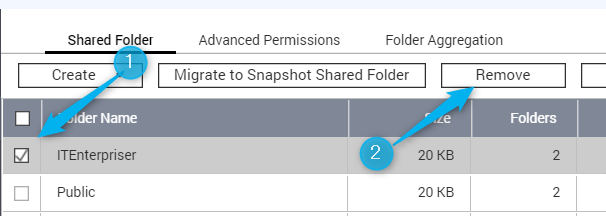
A list of your folders will appear. Click the box next to the folder you want to delete to select it. Once selected, click “Remove.”
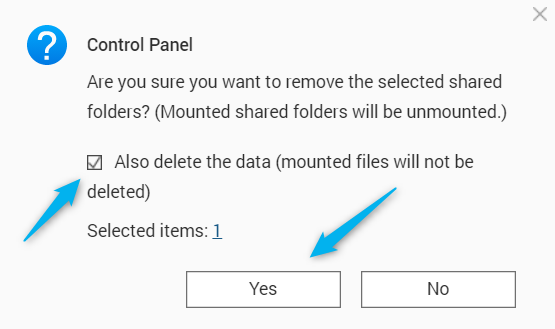
A message will appear asking if you’re sure you want to delete the shared folder. It also gives you the option of deleting the data within the folder. Check the box if you want to do that, and then click “Yes.”
The shared folder is now deleted.
Deleting Default Folders
When you configure your first volume on the NAS, it will create three folders by default–Public, Web, and homes. The Public and Web folders can’t be deleted, as they are necessary folders for QTS. However, you can delete the “homes” folder, but you’ll need to disable an option first.
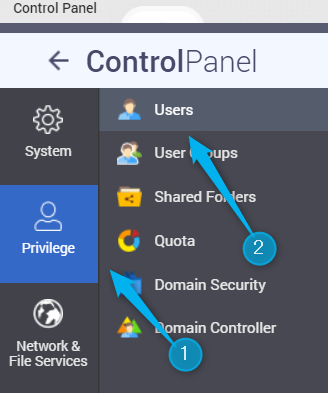
In the Control Panel, click “Privilege” and then select “Users.”
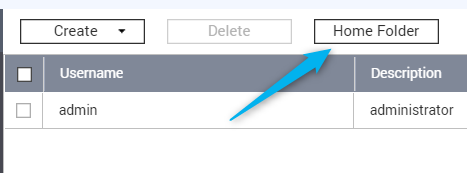
At the top of the window, click the “Home Folder” button, found next to the Create and Delete options.
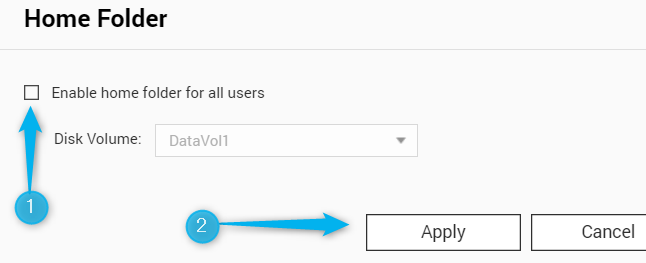
The Home Folder pop-up window will appear. Deselect the “Enable home folder for all users” option and then click “Apply.”
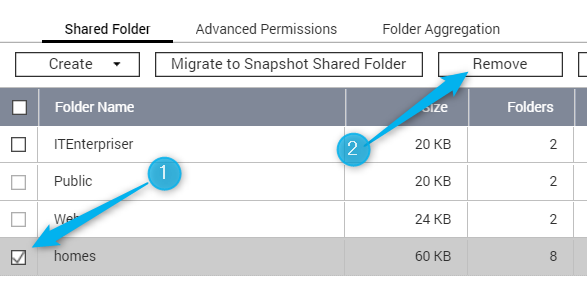
Next, go to “Shared Folders.” You’ll see a list of your folders. You can now check the box next to the “homes” folder. Do so, and then click “Remove” at the top of the window.
The message asking if you’re sure you want to delete the folder and accompanying data will appear. Click “Yes.” The “homes” folder will now be deleted.
The post How to Delete a Folder From File Station on a QNAP NAS appeared first on ITEnterpriser.
]]>The post How to Set Up and Get Started with a QNAP NAS appeared first on ITEnterpriser.
]]>What Is a QNAP NAS?
Network-attached storage (NAS) is a device designed for data storage that generally offers additional functionality. QNAP, founded in 2000, is a company that specializes in the manufacturing of NAS servers, network switches, and various other storage and networking hardware/software.
QNAP provides a NAS solution for everyone–from power users to small businesses to the enterprise. The current selection of NAS ranges in size from 1-bay all the way up to 30-bays, and come in set-top design, tower, and rackmount form factors.
Each QNAP NAS comes with a proprietary operating system depending on which type of NAS you purchased.
- QTS: Linux-based operating system.
- QuTS hero: Combines the app-based QTS with a 128-bit ZFS file system.
- QES: QNAP’s enterprise operating system based on FreeBSD and utilizes the ZFS file system.
The model we’ll be using in this setup process is the QNAP TS-453D NAS, which sports a tower form factor and the QTS operating system.
The Physical Setup of the QNAP NAS
The NAS will arrive with different items depending on which type of NAS you bought. At the very minimum it should arrive with a power cable, an Ethernet cable, some screws to mount the drives to the drive trays, a warranty card, an installation guide, and, of course, the NAS itself.
Most of the time, the NAS will be barebone–meaning it comes without the hard drives. The first thing you’ll need to do is check QNAP’s compatibility list to learn which drives are actually tested and recommended by QNAP for your model.
When it comes to deciding which size drives to purchase, you’ll need to make a decision on how much space you want for actual storage, and how much you want to use for redundancy. Depending on how many drive bays your NAS comes with will determine which RAID types are available. For example, if you have a 2-bay NAS, you can choose between JBOD, RAID 0, and RAID 1. We’ve developed a RAID calculator to help you determine how much available, redundant, and unused storage space you’ll have for your selected RAID type and drive capacity.
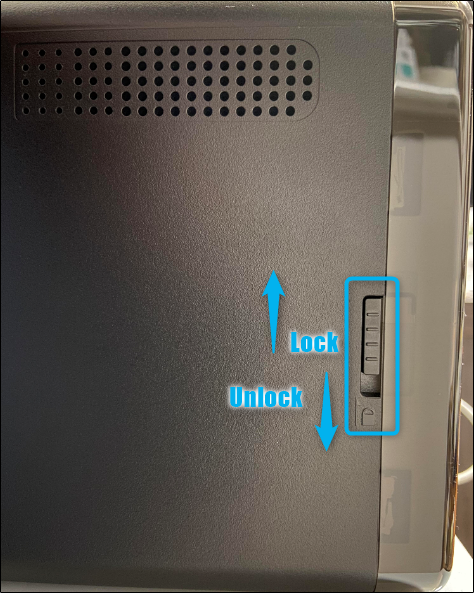
Once you have your drives, it’s time to install them. Our NAS (TS-453D) has a cover over the drive bays that slides off but, depending on your model, the instructions for removing the cover may be slightly different, or you may not even have a cover. If you have a sliding cover, push down the lock switch on the side of the NAS to unlock the cover and then slide the cover off.
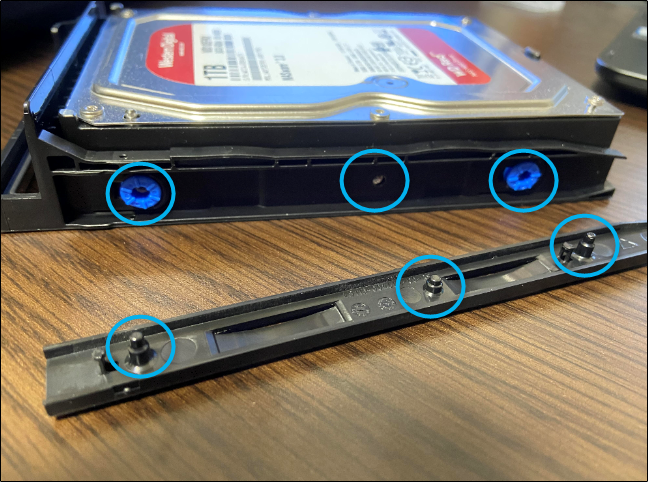
Once you’ve removed the cover, gently pull the trays out. You’ll notice a clip on each side of the tray, which are a part of QNAP’s screwless design. Remove the clips on each side of the tray, place the drive inside, and then add the clips back. To further reinforce the drives, you can add the screws, though this isn’t necessary. However, you’ll need to use the screws if you’re using a 2.5″ drive.
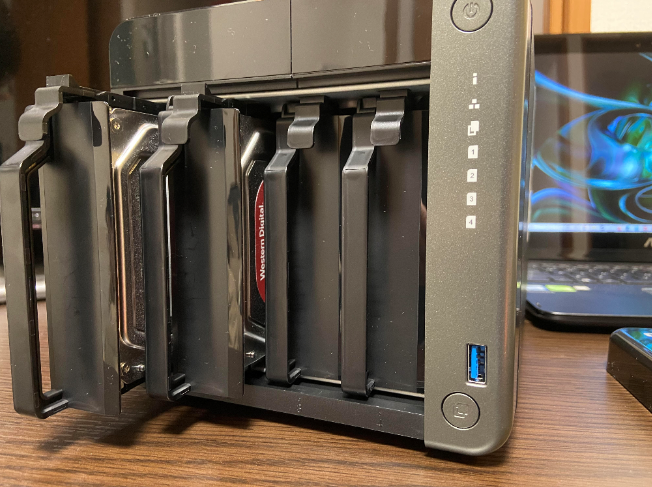
With the drives securely fastened in the trays, slide them back into the NAS.
On the back of the NAS, you’ll find at least one ethernet port and the DC IN power port.
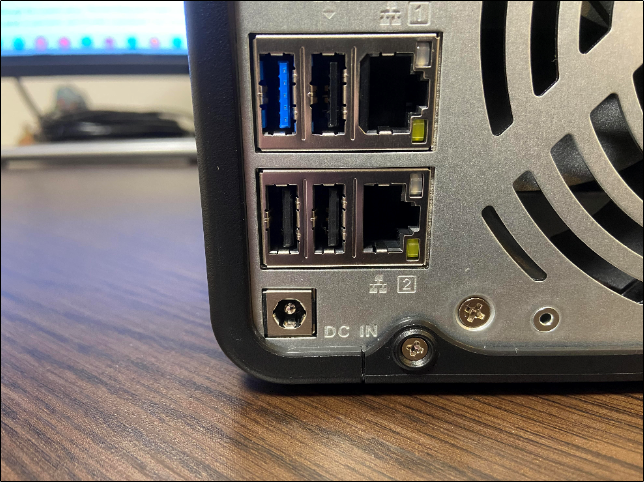
Plug the NAS up to a power source and connect it to your local network with one of the provided Ethernet cables, and you’re good to go.
Configuring the QNAP NAS
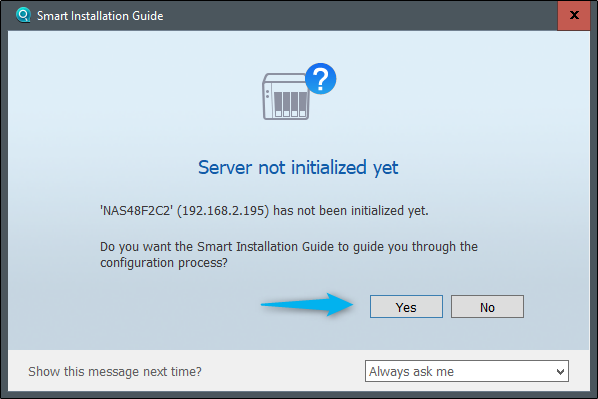
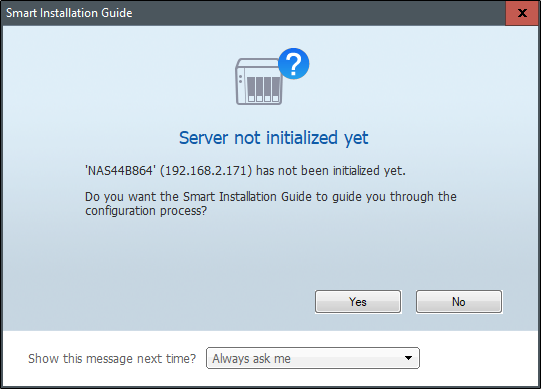
Once you’ve set up the physical aspects of your NAS, turn it on and find the NAS on your local network using Qfinder Pro. When you download and open Qfinder Pro, it should automatically locate your NAS and recognize that it hasn’t been initialized yet. The Smart Installation Guide window will ask you if you want it to guide you through the configuration process. Click “Yes.”
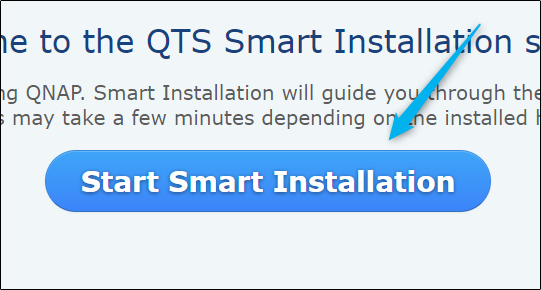
The QTS Smart Installation system will open in your default browser. To get started, click “Start Smart Installation.”
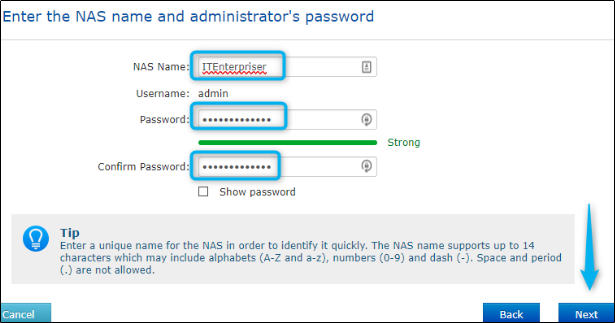
On the first page of the installation guide, you’ll need to give your NAS a name (which will also appear on your network) and the admin password. The NAS name supports up to 14 uppercase and lowercase letters, numbers, and dashes. The password can be up to 64 characters, and supports uppercase and lowercase letters, numbers, and special characters. The password must be at least 8 characters long, but we recommend making it as strong as possible.
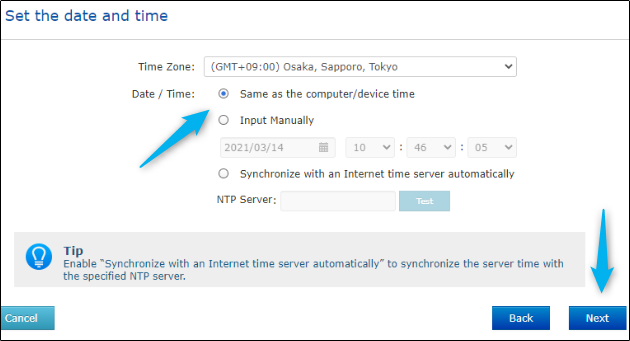
On the next screen, you need to set the date and time. You can choose which time zone you’re in, use the same date/time as your computer, input it the information manually, or automatically sync with an Internet time server.
Click “Next” when you’ve set things up.
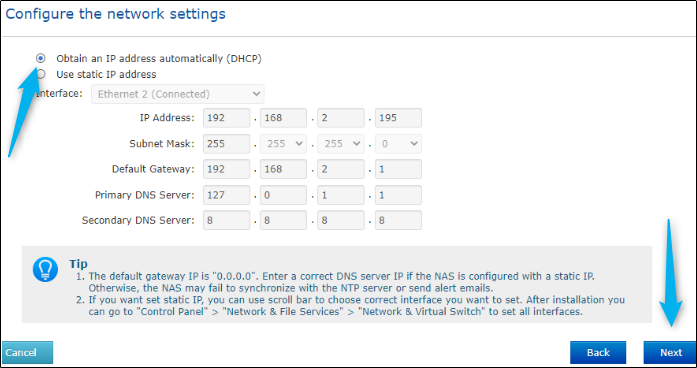
Next, configure the network settings. Automatically obtaining an IP address is the quickest route, but you can also use a static IP address.
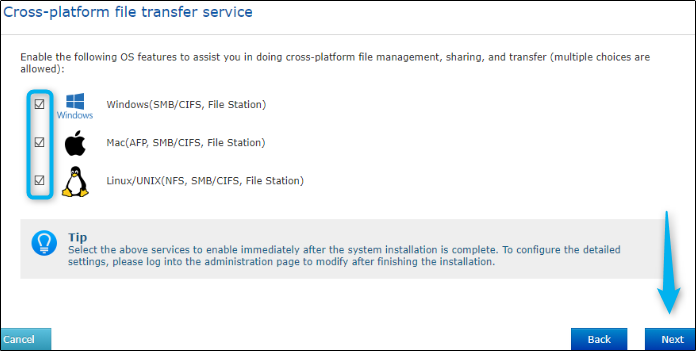
Finally, enable the OS features you want to use for cross-platform file management, sharing, and transferring. You can select more than one option.
The NAS will begin getting things set up, which could take a few minutes. Once ready, the Help Center will appear on the QTS interface, providing a few resources to get you started with your new NAS.
A Brief Overview of QTS
QTS is QNAP’s sophisticated operating system. It’s stable, provides a polished desktop-like interface, and offers a large library of apps, layering additional functionality on your NAS, making it much more than just a storage device.
QNAP supports all the usual NAS options like shared folders, users, user groups, iSCSI, Telnet/SSH, Active directory, Time Machine, AFS/SMB/NFS, and more. QNAP also provides its own web portal-based remote access, plus remote access, multimedia, and sync clients for Windows, macOS, Linux, iOS, and Android.
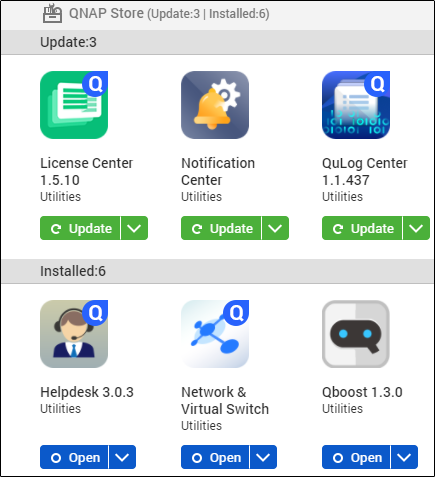
QNAP’s App Center is where you can install, remove, and update apps. QTS will let you know when an application is ready to be updated.
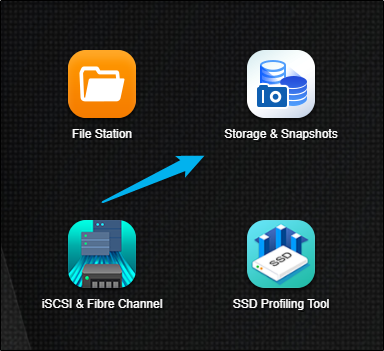
The Storage & Snapshots app is where you’ll manage disks, storage space, and other storage features. To get started using your NAS, you’ll need to create a storage pool and volume. This app is already installed by default.
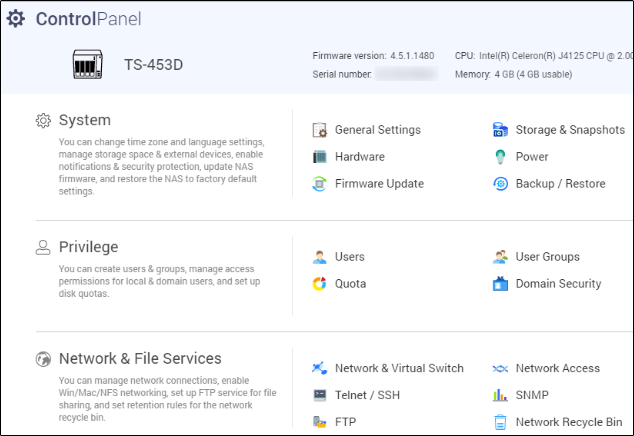
The Control Panel is where you can change system setting, create users and groups (and manage access permissions), manage network connections and file services, and much more.
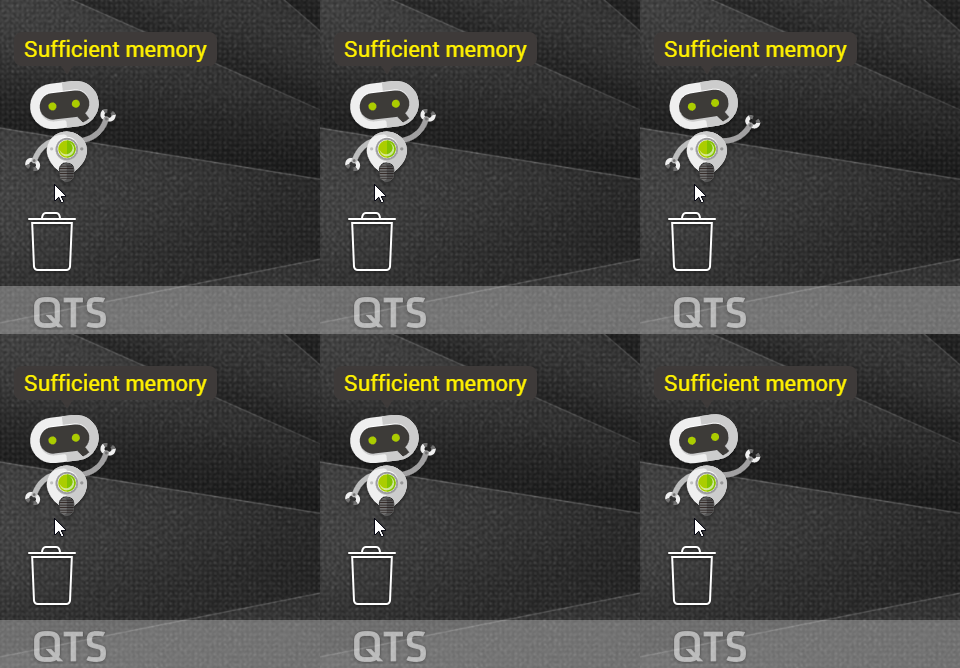
QNAP even provides a friendly robot (Qboost) that lets you analyze system performance.
Now that you’ve got your QNAP NAS set up and initialized, go familiarize yourself with QTS, explore its installed apps (and apps you can install in App Center), and read up on the Help Center documentation to help you continue your journey with QNAP.
The post How to Set Up and Get Started with a QNAP NAS appeared first on ITEnterpriser.
]]>The post Orico Storage Backuper Review appeared first on ITEnterpriser.
]]>Note: Orico is currently running a Kickstarter campaign for the Storage Backuper. The project has already reached its goal, but you can still pledge funds to receive certain rewards based on the amount pledged.
Storage Backuper Design and Specs
The Storage Backuper, for as much good as there is to say about this product, went with a rather interesting choice in design. The look of the case is nice enough–it’s your typical transparent, plastic case with some logos and other marketing content printed on it.
The case itself felt a bit flimsy, though, which was surprising considering the whole idea of the product is to carry around a 2.5″ storage drive in. One nice drop on a hardwood floor may be the end of it. If you’re going to be carrying this around (Orico gives you a lanyard to do just that), be extra careful.
If Orico would consider giving its next model a more sturdy design, we’d likely give it an A+.
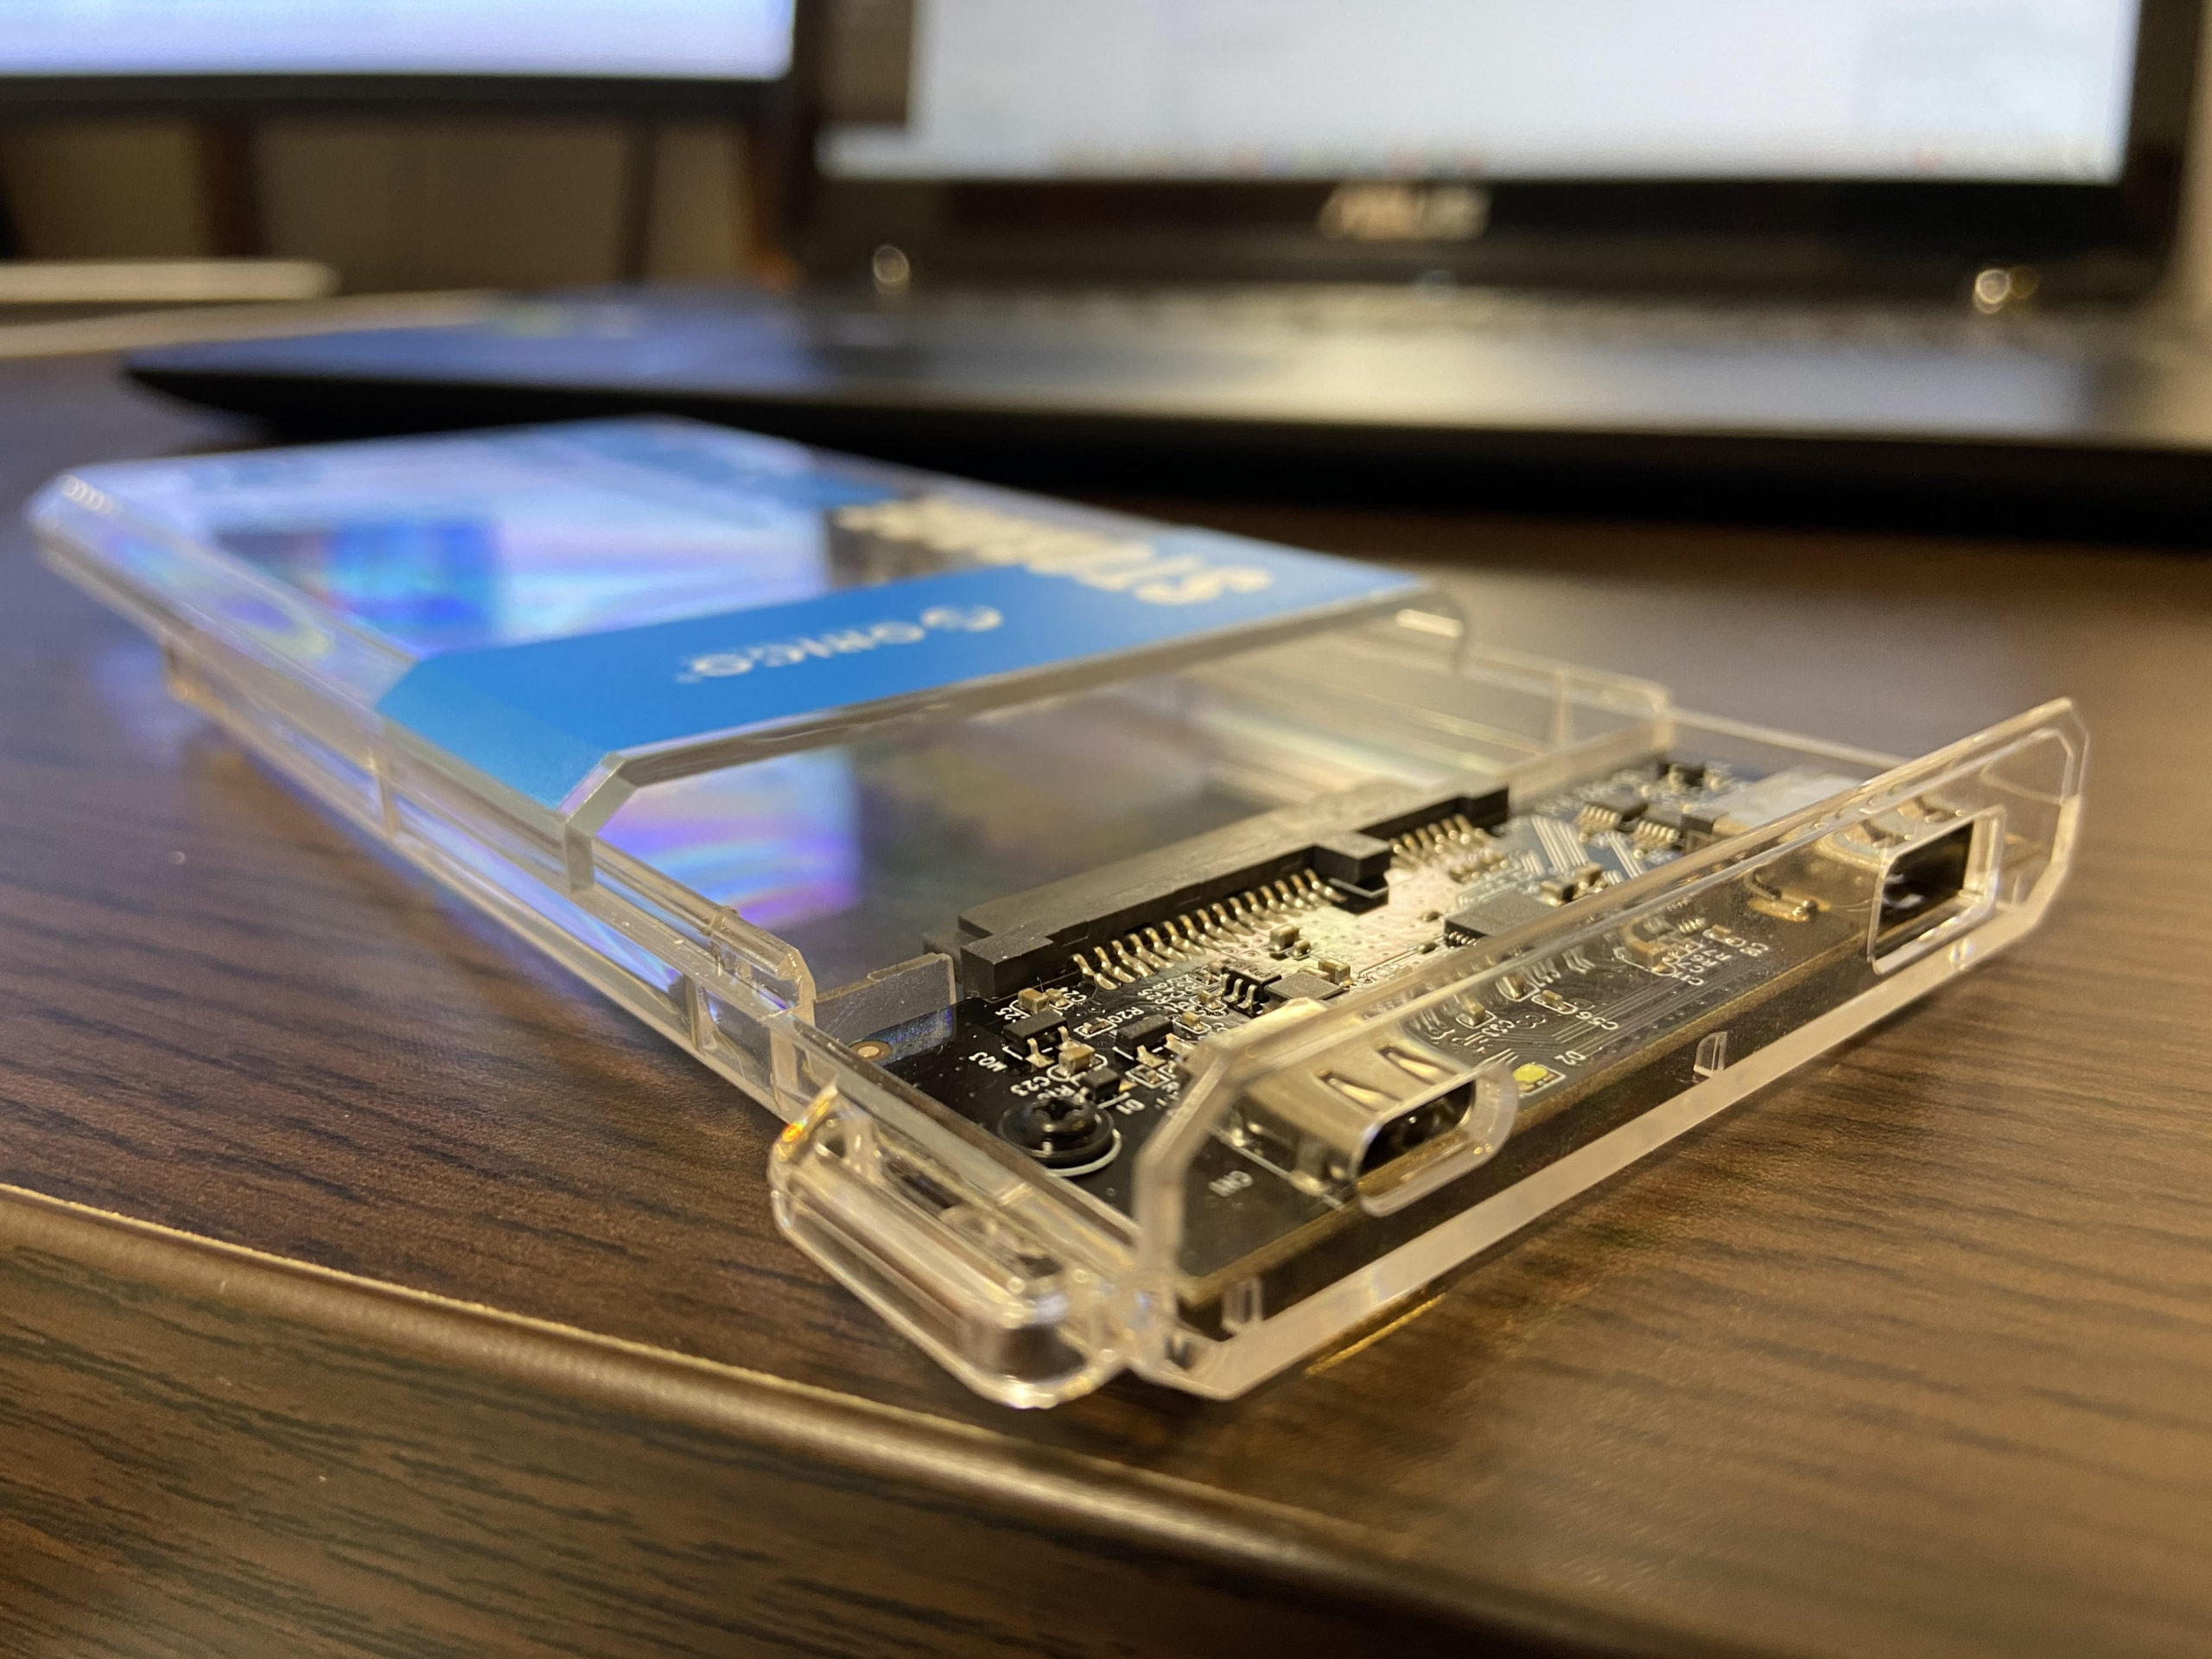
Here’s the product specs for the Storage Backuper.
| Model | ORICO BA2110 |
| Material | PC Transparent Material |
| Color | Clear |
| Output Interface | For phones: USB3.0 Type-A For PCs: USB3.0 Type-C |
| Input | SATA3.0 |
| Transfer Rate | 5Gbps |
| Power Supply | 5V Type-C |
| Installation | Tool-free sliding cover |
| Status Indicator | Light on: Power supply connected Light blinking: Transferring data |
Storage Backuper Compatibility and Features
Storage Backuper is specifically designed for mobile devices (iOS and Android), but it’s also compatible with Windows, Mac, and Linux. The large range of compatibility makes it an ideal backup solution for many different use cases.
In terms of drive compatibility, you can use any 2.5 SATA drive up to 2TB in capacity. You can even use an M.2 NVMe drive with a SATA adapter. OS and drive compatibility makes up for any issues you may have with the previously mentioned build quality.
Orico also developed a really user-friendly app to manage your data within Storage Backuper. The app, called iStore Pro, can be downloaded in Google Play or the iOS App Store.
Android user’s will be happy to know that they can back up their device’s images, audio, files, and contacts. iPhone users? Well, there are some restrictions. Due to some limitations, iPhone users can only do image and contact backup–audio and file is out the window. This may be a deal breaker for many users. Orico is known for being on top of things. I’d guess they’re working on ways to bring a completely compatible device to all users–it would seriously surprise me if they weren’t.
Final Thoughts
Orico is a great company. They make really good, affordable products. The physical quality of the Storage Backuper was a little concerning, but given its multi-device, multi-drive compatibility, this is one backup device you’ll wanna take a good, long look at.
I’m excited to see what comes next. Fingers crossed for a a sturdier design with a metal case (most users are willing to spend extra for this), and full iOS compatibility.
The post Orico Storage Backuper Review appeared first on ITEnterpriser.
]]>The post iXsystems Launches R-Series Systems and Scale-out HCI Software appeared first on ITEnterpriser.
]]>Meet the TrueNAS R-Series
The new R-Series includes four models, each featuring Intel Xeon Scalable CPUs and, according to iXsystems, are capable of delivering up to 100 Gbps of storage performance with the proper memory, processing, and networking configuration.
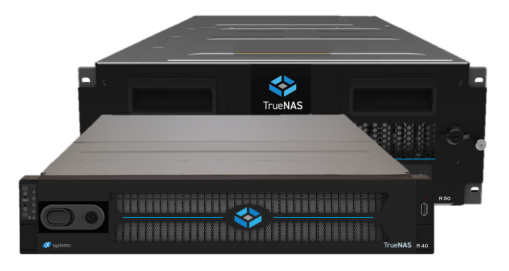
These are the four models added to the portfolio:
- TrueNAS R50
- Form Factor: 4U rackmount
- Capacity: Up to 890 TB
- This model can also scale-up to 3 PB and scale-out to 300 PB
- TrueNAS R40
- All-flash
- Form Factor: 2U rackmount
- Capacity: Up to 360 TB
- TrueNAS R20
- Form Factor: 2U rackmount
- Capacity: Up to 230 TB
- TrueNAS R10
- All-flash
- Form Factor: 1U rackmount
- Capacity: Up to 120 TB
All models of the TrueNAS R-Series are compatible with all three of the TrueNAS software editions:
Pricing for R-Series models starts at around $4,000 USD.
TrueNAS SCALE Hyperconvergence
iXsystems also announced today the release of TrueNAS SCALE, its HCI platform for converged compute and scale-out Open ZFS storage. TrueNAS SCALE, a free, open-sourced project, backed by more than 250k users worldwide, adds Linux Containers, KVM, and scale-out ZFS storage capabilities.
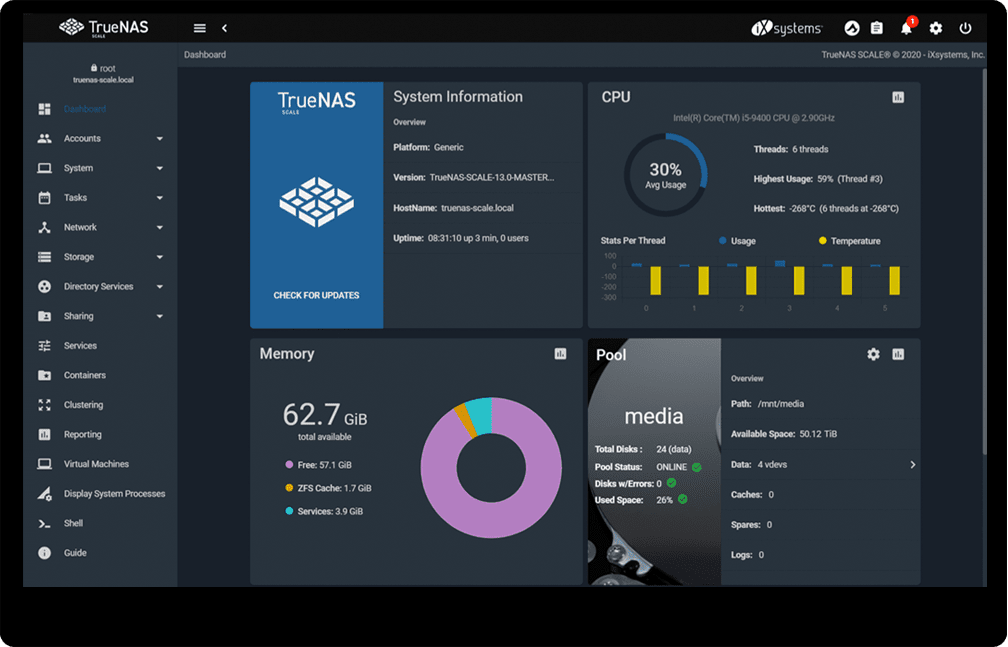
It’s worth mentioning that TrueNAS SCALE is being released in its Alpha stage (codenamed “Angelfish”) and should not be used for production environments. The current roadmap indicates TrueNAS SCALE will be ready for production environments in Q2 of 2021, according to a recent post on their official blog.
By then, users can expect all major TrueNAS CORE storage and sharing features, plus several SCALE-specific features derived from the app’s Linux base.
If you’re wanting something to put in production now, it’s recommended you use TrueNAS CORE, as there are still many features in SCALE that have known issues, bugs, aren’t fully feature-complete, or are still in the early stages of development. But, for the enthusiasts amongst us, there are some verified features working in SCALE.
Here’s the current list of verified features, according to the official documentation:
- Pool Management
- SMB Shares
- iSCSI Shares
- NFS Shares
- S3 Shares
- AFP Shares
- Online/Offline updating
- Virtual Machines (Using KVM)
- WebDAV
- Monitoring, Alerting, and Reporting
If your curious about the features currently in the provisional and experimental stages, you can read about them via the SCALE 20.10-ALPHA (Anglefish) release notes.
You can download TrueNAS SCALE now–just make sure you meet the 64-bit CPU and 8 GB RAM requirements. If you do download TrueNAS SCALE, you can keep track of the bug fixes made on the site’s changelog. If you happen to find bugs when using the software, you can contribute by reporting bugs on their Jira bugtracker.
A Word From the Executive VP
“TrueNAS is enabling a new era in Open Storage for businesses in every sector that have requirements for reliable, secure, and agile data access while removing the limitations of proprietary storage. TrueNAS systems and solutions democratize enterprise storage by providing best-in-class platform choices combined with Open Storage software to deliver ‘Storage Freedom’ and open Source economics to our customers around the globe.”
-Brett Davis, Executive VP, iXsystems
The post iXsystems Launches R-Series Systems and Scale-out HCI Software appeared first on ITEnterpriser.
]]>The post How to Reset a QNAP NAS to Factory Default appeared first on ITEnterpriser.
]]>Restore Your QNAP NAS to Factory Default
Restoring a QNAP NAS to its factory default means you will completely reset the NAS and wipe all of the data that’s stored on the hard drives. If you lost your password, you can perform a system reset without deleting your data.
To factory reset your QNAP NAS, log in to the NAS and open the “Control Panel” app. The app should be on your home screen but if it’s not, you can click the hamburger icon in the top-left corner of the window and select “Control Panel” under the “Systems” group.
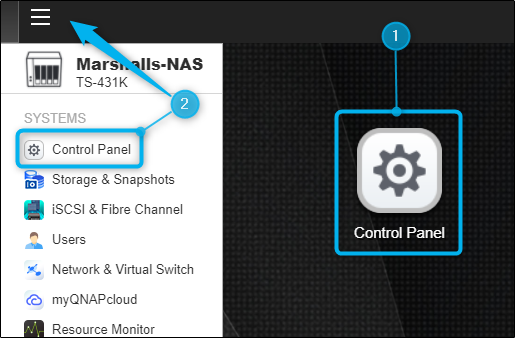
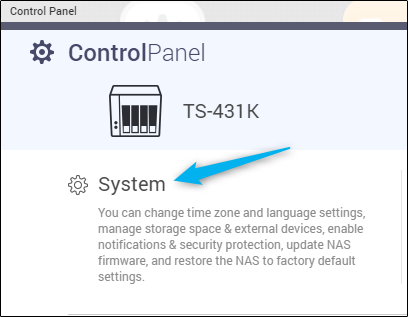
The “Control Panel” window will appear. Here, select “System.”
In the next screen, you’ll see a list of different system settings topics in the “System” sub-pane. Click “Backup / Restore.”
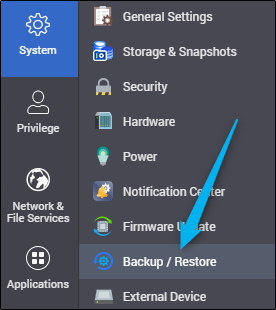
Next, select the “Restore to Factory Default” tab.

On the next page, you’ll have three options to choose from:
- Restore Factory Defaults & Format All Volumes – Restores default system settings and formats disk volumes. When using this option, your volumes and RAID group will remain, though the volumes will be empty.
- Reset Settings – Restores the default system settings without erasing user data.
- Reinitialize NAS – Completely erases all user data and reinitializes the NAS. This option restores the NAS as if you just pulled it out of the box.
While the first and third option will both accomplish the same goal, if you have any issues at all with the NAS, select “Reinitialize NAS.”

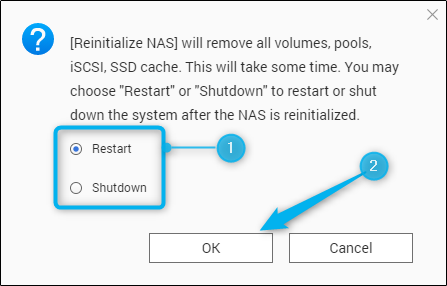
A pop-up window will appear, alerting you that this option will remove all volumes, pools, iSCSI, and SSD cache. Choose if you’d like to restart or shutdown the NAS after reinitialization, and then click “OK.”
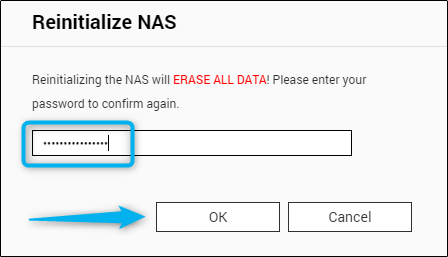
Finally, enter your password and click “OK” to confirm you really want to factory reset the QNAP NAS.
This will take a bit of time to complete.
Reset QNAP NAS System Settings
It’s also possible to reset the system settings without losing user data. You can do this by performing a software or hardware reset. If you lost your password, you’ll need to perform a hardware reset.
Software Reset System Settings
To reset your system settings using the software reset feature, navigate to the system settings’ “Backup / Restore” tab (Control Panel > System > Backup / Restore), and then select the “Restore to Factory Default” tab.
Here, select “Reset Settings.” As mentioned in the UI description, this option restores system settings to default but retains user data.

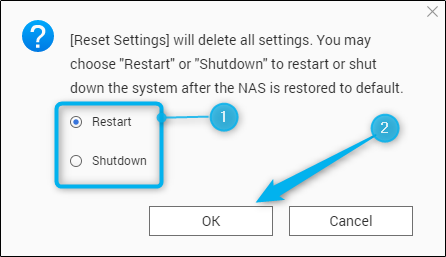
A pop-up window will appear, stating this will delete all system settings. Choose if you’d like to reboot or shutdown the NAS after the process is complete, and then select “OK.”
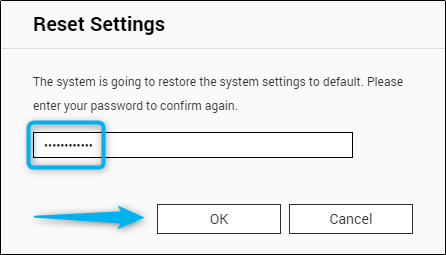
Finally, enter your password for final confirmation that you’d like to proceed.
After a while, your system settings will be reset to default.
Hardware Reset System Settings
If you forgot your password, hardware reset your system settings to gain access to your NAS. No user data will be lost in either hardware reset type.
There are two types of hardware resets you can perform–soft or hard resets. Regardless of the type you choose, you will need to locate the reset button on the back of your NAS, and use a small pin to press and hold the button for a certain amount of time.
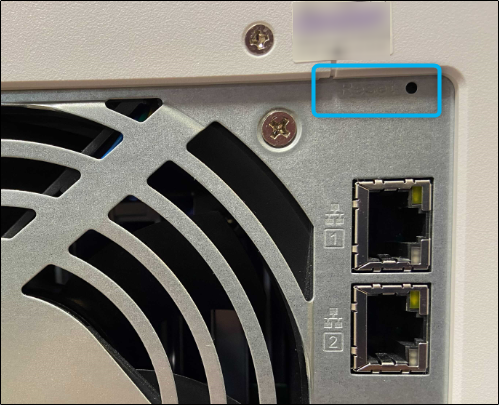
Here’s how to perform each reset type, and what they do.
Soft Reset (3 Seconds)
To perform a soft reset, press and hold the reset button on the back of the NAS for 3 seconds. Let go of the button once you hear a beep.
As stated on the manufacturers online documentation, these are the settings that will be reset to default with a soft reset:
- Login credentials (username and password)
- TCP/IP configuration
- Obtain IP address settings automatically via DHCP
- Disable Jumbo Frame
- For dual LAN models, if port trunking is enabled, port trunking mode will be reset to “Active Backup (Failover)”
- System Port: 8080
- Security level: Low
- VLAN will be disabled
- Service binding
Hard Reset (10 Seconds)
Performing a hard reset has the same effect as using the software reset feature. That is, it completely resets the system settings to default. Data on the drives will remain intact, however, you’ll need to create the same network shares on the NAS in order to retrieve the old data.
To perform a hard reset, press and hold the reset button on the back of the NAS for 10 seconds.
Disable the Hardware Reset Button
If your NAS is in an open area (not recommended), then you may want to disable the reset button on the back of the NAS to prevent someone from being able to reset your NAS. Note that this is not recommended, and if you disable the hardware reset button, you will not be able to reset your admin password or system settings using the hardware reset method. Ideally, keep your NAS in a location that is only accessible by authorized users.
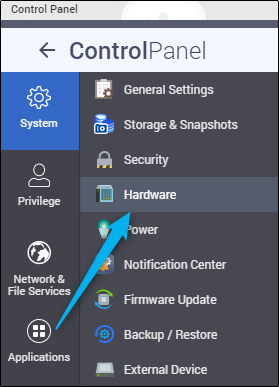
If you’d like to disable the hardware reset button on the NAS, open the “Control Panel” app, click “System,” and then click “Hardware” in the sub-pane.
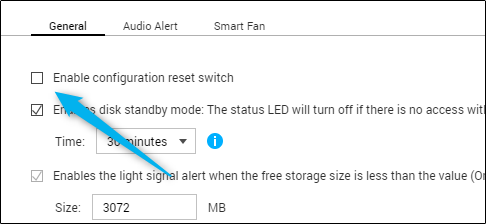
In the “General” tab, uncheck the box next to “Enable Configuration Reset Switch.”
Next, click the “Apply” button at the bottom of the window. A pop-up message will appear, warning you that you won’t be able to reset the password and system settings if you disable the reset button. Click “OK.”
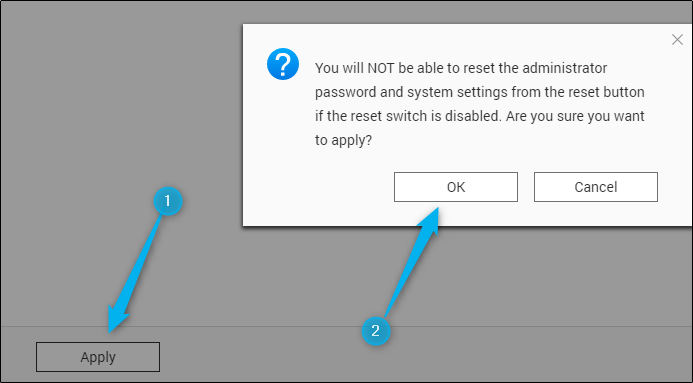
Once applied, the reset button will be disabled.
Default Login Credentials
If you reset your NAS, you’ll need to use the default login credentials to access the NAS. The login credentials are different based on the QTS version you use.
- QTS 4.4.1 and earlier
- username: admin
- password: admin
- QTS 4.4.2 and later
-
- username: admin
- password: MAC address (all caps, exclude special characters)
The post How to Reset a QNAP NAS to Factory Default appeared first on ITEnterpriser.
]]>The post ASUSTOR AS5304T Review: Slick, Gamified NAS appeared first on ITEnterpriser.
]]>Going into this review, we were excited to see what all the fuss was about–and we weren’t disappointed. ASUSTOR has set the bar high for 2.5 GbE NAS for consumers and though it may appear a bit pricey at $429, you’re definitely getting what you pay for.
AS5304T Design and Build
The ASUSTOR AS5304T sports a solid black finish, complimented with a red logo and status icons. The front of the NAS has a magnetic panel that covers the four bays hidden behind it. To the left of the panel are the aforementioned red status indicators, accompanied with LED lights. Below the lights you’ll find a One Touch Backup button and a USB 3.2 port.
You can tell by looking at this slick NAS that it’s gaming-inspired. Not like the “built with bricks and concrete in Minecraft” look that many NAS’ have, but more like the 4K, modern, futuristic kind.
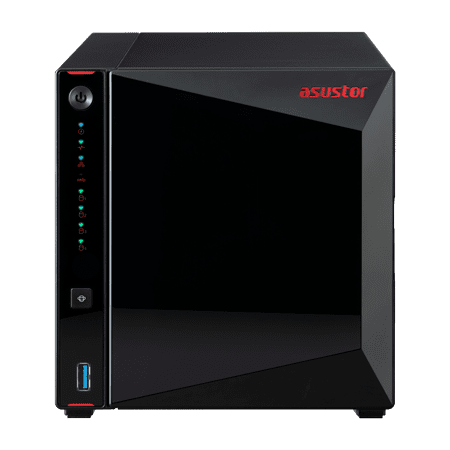
With the magnetic cover removed, you’ll see the four drive bays. Unfortunately, these bays can’t be locked, nor can the magnetic cover–which is a personal must con for me. Although this is a NAS for home users, I still like to be able to lock the drive bays. ASUSTOR has other models that have locking drive bays, so I’m not sure what the limitations here were.
To open the drive trays, simply pull the bottom of the latch and slide the tray out.
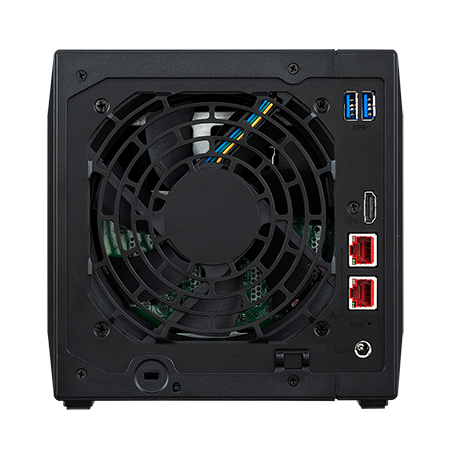
On the backside of the NAS you’ll find a large system fan that keeps the internal components cool. Beneath the fan is the Kensington security lock and to the right of the fan, starting from the top, you’ll find two USB 3.2 ports, one HDMI port, two 2.5GbW RJ45 ports, and a DC input jack.
AS5304T Features and Performance
The AS5304T comes with all the bells and whistles you’d expect from a NAS server in terms of backup, storage, and security applications. In fact, ASUSTOR has a pretty mature app ecosystem, and even provides their surveillance, Surveillance Center, with this NAS. Very nice!
When it comes to setting up the NAS, ASUSTOR did a great job simplifying the process. Connect it to the local network and find the NAS using ASUSTOR Control Center. The Wizard is straightforward, so you won’t have any problems getting it ready to go.
Of course, you’ll need to install a few drives since it doesn’t come equipped with any. We used 960GB IronWolf 110 SSDs (which are the same drives used when ASUSTOR tested the NAS).
During the initial setup, you’ll need to decide which file system and RAID level you’d like to use. Assuming you have all four bays filled, these are your options:
After the initial setup is complete, you’ll see ASUSTOR’s beautiful OS, ADM. ADM has a clean, game-inspired desktop feel. Here, you can tweak any additional settings you may want, add additional users, etc.
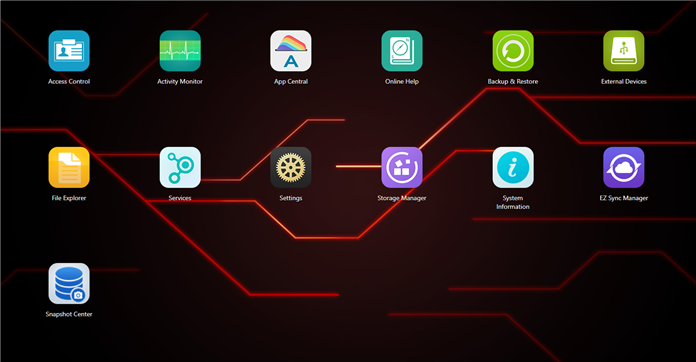
You can also install additional apps from the “App Central” app. Installing new apps is as easy as clicking the “Install” button under the app.
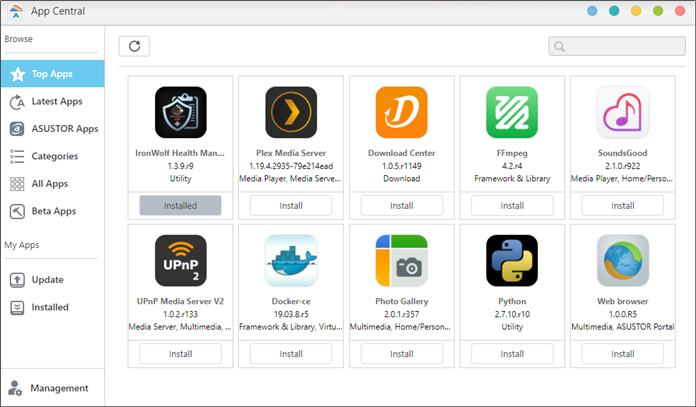
ASUSTOR provides some business-oriented apps with this NAS, but this NAS will generally be used at home for personal use. That said, here are some of the apps you may be interested in for home use:
- Plex Media Server
- ASUSTOR Live
- ASUSTOR Portal
- iTunes Server
- DataSync Center
- LooksGood
- MiniDLNA
- Photo Gallery
- Remote Center
- SondsGood
- UPnP Media Server
- UPnP Media Server V2
If you need help deciding which apps are right for you depending on what you want to accomplish, ASUSTOR gives you a “Categories” section that separates the apps based on use case.
For testing, we moved a folder with a mix of media and document files and saw results of 244MB/s. Take advantage of the dual 2.5GbE link aggregation this NAS offers and expect to see much better numbers. Streaming 4K videos was flawless as well, with no stuttering or lag.
Is the AS5304T Worth the Price?
At first glance, the AS5304T seems a bit pricey when considering you’ll need to buy your own drives. If you buy the NAS and add four 4TB Seagate IronWolf drives, for example, you’re looking at around $850 at least.
However, that’s almost always going to be the case, no matter which brand or consumer NAS model you go with–unless you hit some special campaign. When you consider the top notch components ASUSTOR equipped this box with, in addition to the very nice performance and full suite of apps for streaming and data storage, you honestly could do much, much worse than the AS5304T.
In a word: Yes.
The post ASUSTOR AS5304T Review: Slick, Gamified NAS appeared first on ITEnterpriser.
]]>The post How to Find Your QNAP NAS appeared first on ITEnterpriser.
]]>How to Find Your QNAP NAS with Qfinder Pro
QNAP makes finding your NAS extremely simple with Qfinder Pro, a utility that locates each QNAP NAS that’s connected to your local network. This isn’t the only means of locating and accessing your QNAP NAS–you can find the NAS’s IP address and enter it in the address bar–but it is the quickest and easiest. Especially for first time setup, since you won’t have the IP address readily available.
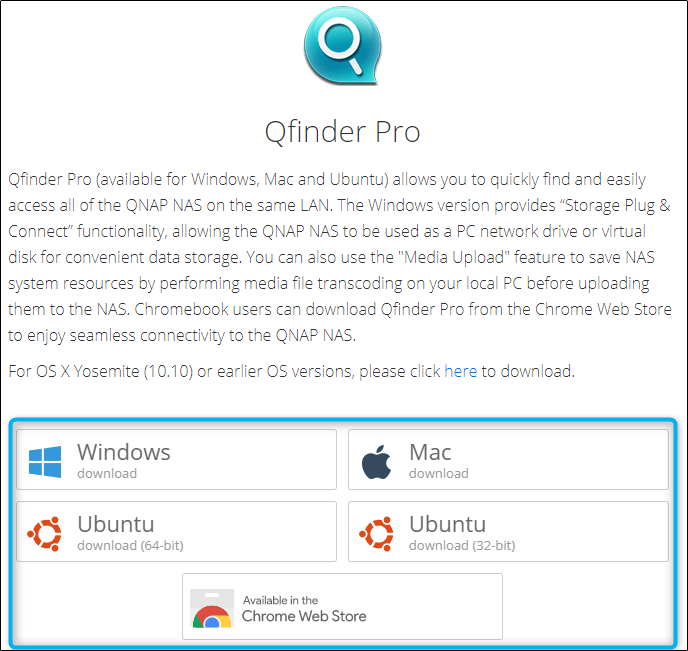
Go to QNAP’s official website and download Qfinder Pro, which is available for Windows, Mac, and Ubuntu.
After the software is downloaded, the Wizard will guide you through the installation process. At the end of the installation, the wizard will prompt you to open Qfinder Pro. If you want to come back to it later, you can access Qfinder Pro from the created desktop icon.
![]()
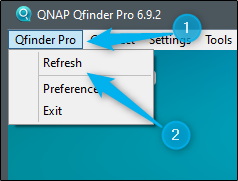
Once opened, your NAS should appear in the device list. If it doesn’t, select “Qfinder Pro” in the top-left corner of the window, and then select “Refresh” from the drop-down menu.
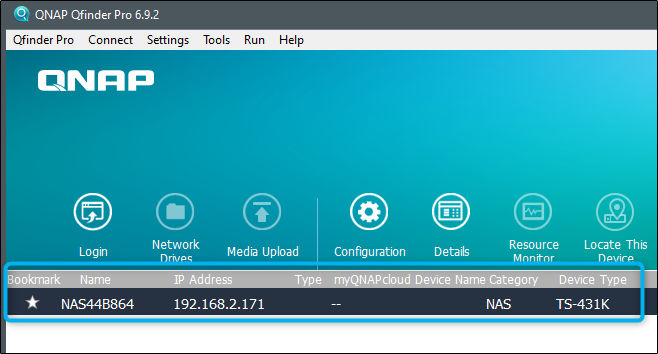
Your QNAP NAS should appear in the list. Some of the details include the name, model, IP address, MAC address, and more.
Double-click the NAS you would like to access. As a side note, if there’s a NAS on the list that hasn’t been initiated yet, Qfinder Pro will automatically detect this and prompt you to configure it.
How to Find Your QNAP NAS IP Address without Qfinder Pro
If you already know the IP address of your NAS, you can simply type it into the address bar of your browser. However, if it’s your first time using the NAS, you’re not going to know its IP address. We strongly recommend using Qfinder Pro, as QNAP created this application to save you this cumbersome process, but if you want to feel like a hacker, you can use Command Prompt on Windows 10.
Using Command Prompt, you can locate all of the device’s on your local network, along with their IP address and MAC address. There’s also a way to verify which address belongs to your QNAP NAS.
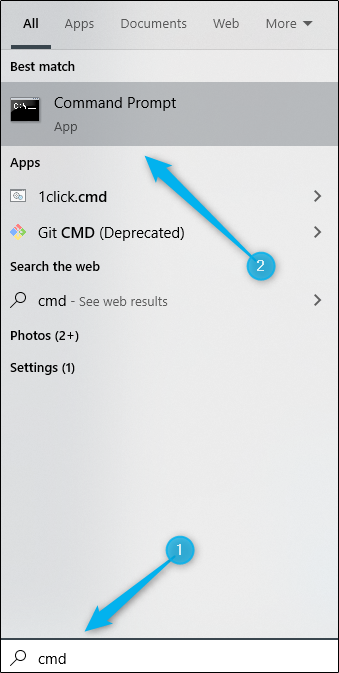
Open Command Prompt in Windows 10 by typing “cmd” in the Windows 10 search bar, and then selecting the “Command Prompt” app from the search results.
In Command Prompt, run this command:
arp -a
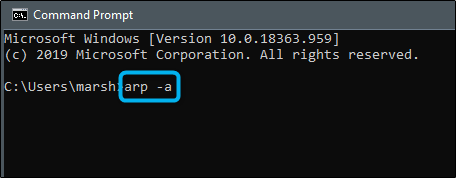
Once the command has been executed, you should see the information of all the devices connected to your local network.
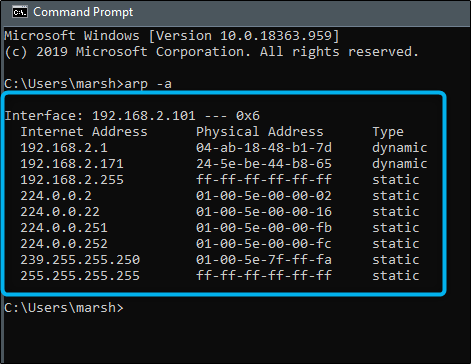
As you can see, it returns the Internet Address (IP Address), Physical Address (MAC address), and Type of each device on the network. This returned list may overwhelm you, but we can safely ignore some of these. Let’s dissect this.
At the very top, next to “Interface,” you’ll see an IP address. This is your network adapter’s IP address. Since we know this isn’t what we’re looking for, we can ignore it.
In the actual list, we see a few IP addresses that look like 192.168.x.x. These are what you want to look at, as the represent physical devices connected to the network. All of the other’s, such as 224.0.0.2 and after, represent not physical devices, but IPs used for multicasting. So they can also safely be ignored.
So in our example, we’ve narrowed it down to three potentials. If you want to find out which one is your QNAP NAS, take the Physical Address (MAC address), and plug the value in the MAC address lookup from DNS checker.
For example, we’ll check this MAC address from our list:
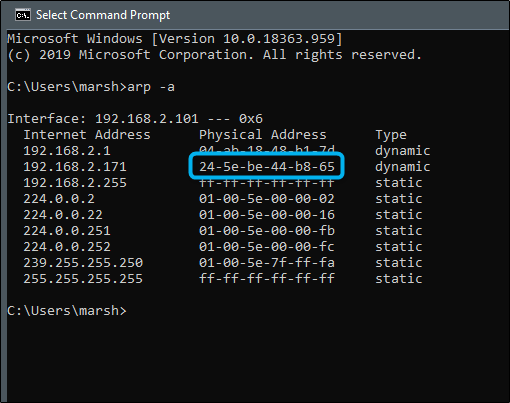
In DNS Checker’s MAC address lookup tool, we’ll input the selected MAC address and click “Search.”

The results will be returned in a few moments.
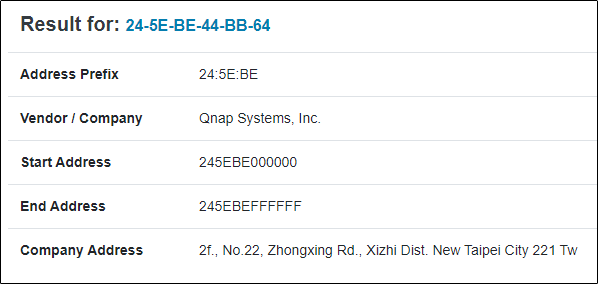
So now that we’ve verified that the MAC address 24-5E-BE-44-BB-64 belongs to our QNAP NAS, we can go back to Command Prompt and grab the correct IP address.
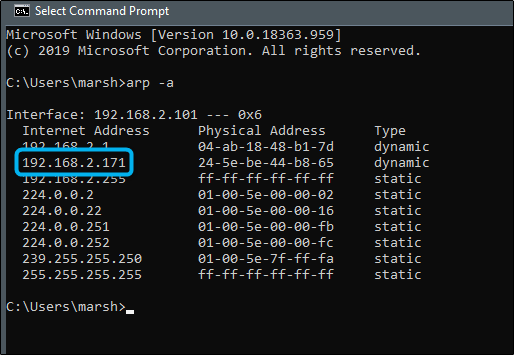
You can now enter that IP address in the address bar of your browser to access the QNAP NAS.
In the example we provide, we only have three IP addresses that we need to look at. However, in most cases, you’ll see many, many more. And if you have multiple QNAP NAS on your network, you may have a hard time finding which IP address belongs to the specific model you’re looking for.
So, use Qfinder Pro.
The post How to Find Your QNAP NAS appeared first on ITEnterpriser.
]]>The post How to Set Up Your ASUSTOR NAS appeared first on ITEnterpriser.
]]>What is an ASUSTOR NAS?
ASUSTOR is a company, founded in 2011 under its parent company, ASUS, dedicated to manufacturing Network-Attached Storage (NAS) servers, a computer appliance for storing and serving files. A NAS is connected to your local network and is more secure than cloud-based storage solutions.
ASUSTOR manufactures NAS products for a large range of users, from personal to power users to SOHO to the SMB. If you’re still in the purchasing phase, you can look at their large selection of products on their official site.
ASUSTOR NAS comes in two different form factors: tower and rack models. Which model you go with, of course, depends on your environment. For home use, you’ll want to go with a tower model. If your NAS is going to be stored in a server room at an office, and if you have a rack at your disposal, consider a rack model if it fits your needs.
What is the ASUSTOR Operating System?
The ASUSTOR operating system is a proprietary operating system known as ASUSTOR Data Master (ADM), which comes pre-installed with every NAS in their lineup. ASUSTOR designed ADM for a usability, easy navigation, and they didn’t slack on the aesthetics either. Sporting a web-based graphical UI, it’s about as user friendly as it gets.
ADM also comes pre-installed with all the essential apps you’d need in the beginning–plus more. Additionally, they provide an app store called APP Central that has a large library of interesting apps you can install on your device.
Physically Setting Up Your ASUSTOR NAS
With that brief background out of the way, it’s time to set up your ASUSTOR NAS. When you purchase your NAS, you’ll find this content packed with it:
- Installation Guide
- x1 AC Adapter and Cable
- x2 RJ-45 Cat5e Ethernet Cables
- An appropriate amount of Phillips Screws (for 2.5″ drives)
You’ll need to purchase the HDDs or SSDs separately. Before you make a purchasing decision, be sure to verify the drives you have in mind are compatible with your selected NAS. ASUSTOR provides a compatibility list that shows each drive that was vetted and approved to be compatible by their engineers. It’s highly recommended that you choose your drives from this list.
When it comes to drive selection, you’ll want to compare the data storage space you need for storage and the space you need for data redundancy. This can be a bit confusing when choosing your RAID type, so we designed a RAID Calculator to help you understand how your selected combination of drive sizes will impact available storage space and redundancy.
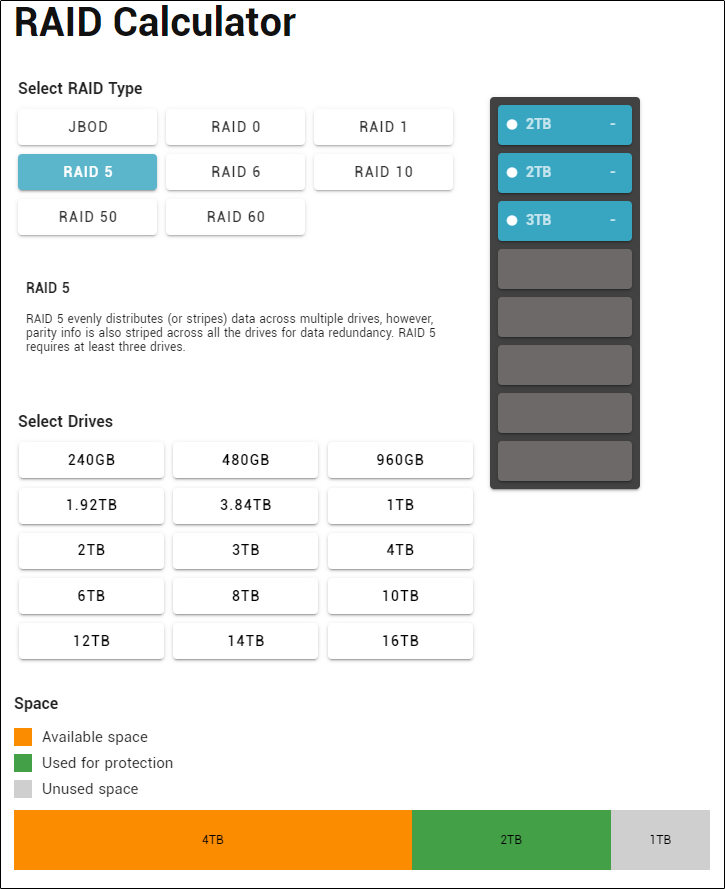
Depending on the model you purchased, access to the drive trays will be different. Some models have a magnetic front that you need to remove to uncover the drive trays, while others are already exposed.
Go ahead and remove the dray trays. You can do so by unlocking the handle (by pressing a button or pulling the handle) and sliding the tray out. Once the tray is out, remove the side bars on the tray, place the drive in, and then replace the side bars. As you can see, ASUSTOR implemented a screwless design with their trays. However, if you’re using 2.5″ drives, you’ll need to add some screws.
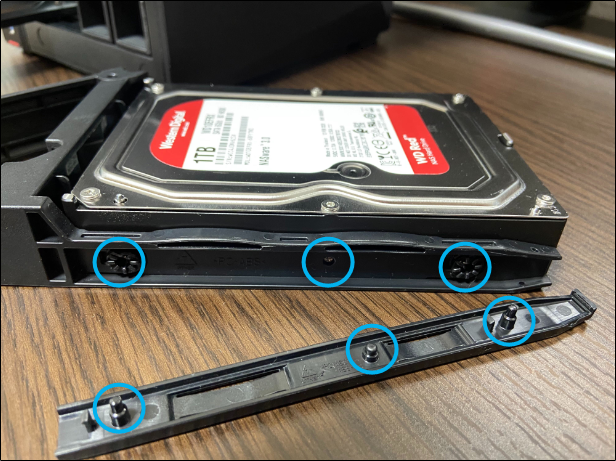
Once you’ve securely placed the drives in the tray, slide the trays back into the NAS.
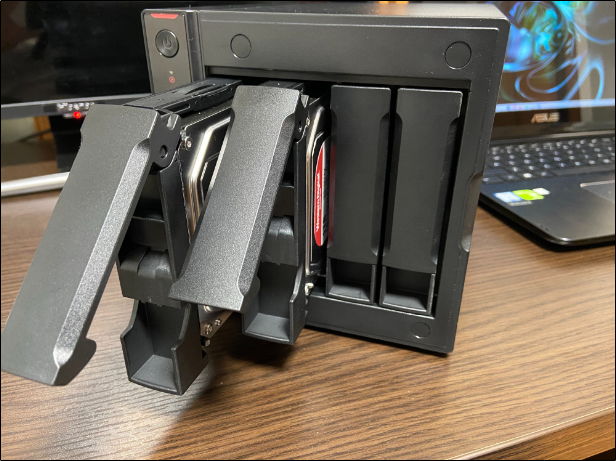
Now that the drives are in the NAS, go ahead and plug the NAS up to a power source and connect it to your local network with one of the provided Ethernet cables.
Configuring Your NAS
Now it’s time to configure your NAS. Locate the NAS on your local network or, if you know the IP address, type it into your browser’s address bar. You can download ASUSTOR Control Center to search for your NAS.
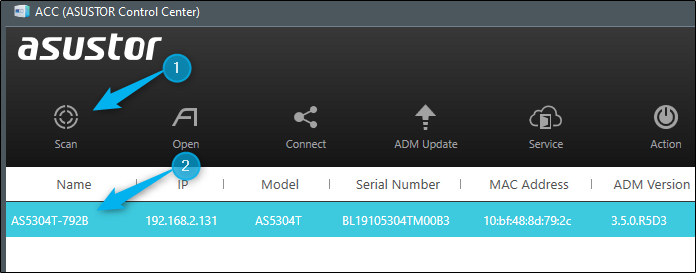
Once you’ve accessed your NAS, you’ll be greeted by the setup wizard. In the first step, you’ll be presented with two setup options:
- 1-Click Setup: Uses optimized settings based on your computer settings and the drives you are using. (Recommended by ASUSTOR)
- Custom Setup: Manually configure the settings.
We’ll go through the custom setup. The first thing you’ll need to do here is (1) enter the server name, (2) enter a username, and (3) enter a password. Use a secure password!
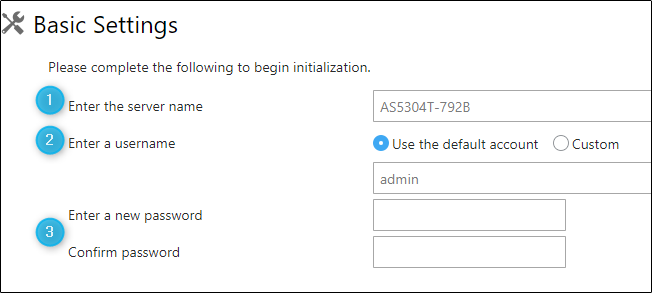
The next two pages are for setting up your date and time, and also your network settings, such as using link aggregation, IP settings, and so on. Once you make it past that, you’ll handle volume settings.
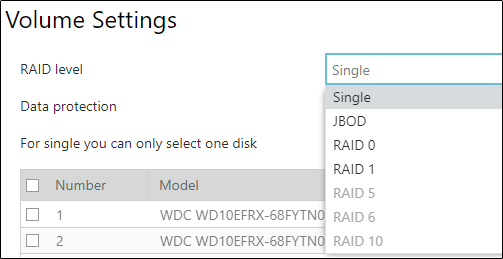
The first step here is choosing a RAID level. Depending on how many bays your NAS has and how many drives you have to accompany it determines which RAID types you can use. For our 4-bay NAS, these are the available options:
When you’ve selected your RAID type, check the boxes next to each drive to add them to the array. Note that even if your NAS supports RAID 10, for example, if you don’t have enough drives then the option will be grayed out.
Next, you’ll get to choose your preferred file system. You’ll have two options:
You’ll also see a warning stating that data on the drives will be erased and you can’t recover the lost data. If you’re sure it’s ok to proceed, check the box to confirm you’ve read and understand the note.
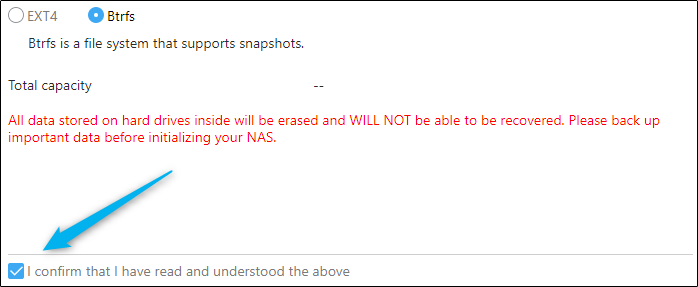
Finally, you’ll make it to the initialization screen. Just sit back and relax while your NAS does all the heavy lifting.
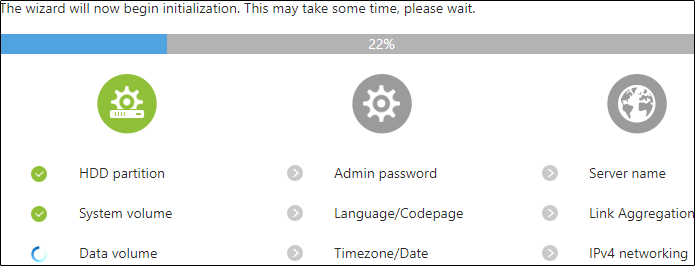
After this is complete, you can then register your NAS and/or select some applications to install. If you’d like to save this for later, you can just skip these steps.
On the final page, you’ll see that the initialization is complete! Click “Start” to start using your ASUSTOR NAS.
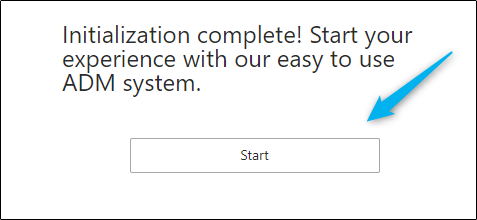
Once selected, you’ll be brought to the home page of your ASUSTOR NAS. That’s all there is to it! Your ASUSTOR NAS is now set up and ready to use.
The post How to Set Up Your ASUSTOR NAS appeared first on ITEnterpriser.
]]>The post How to Make Your ASUSTOR NAS More Secure appeared first on ITEnterpriser.
]]>Strengthen Your Login Credentials
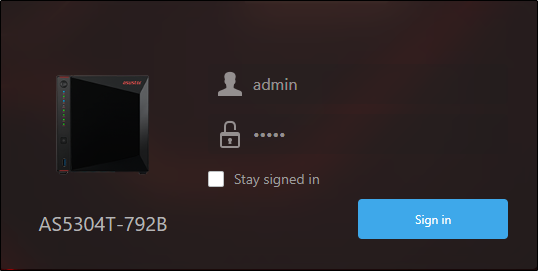
When you first set up your ASUSTOR NAS, or if you perform a soft reset on it, your system admin password will be admin. If you leave it as-is and someone manages to find the NAS on your network, you’re going to get hacked. Period.
Unfortunately, ASUSTOR doesn’t allow you to change the name of the default admin account. That means that if the would-be hacker knows anything about ASUSTOR NAS and wants to hack yours, they’ll already know the username of the admin account is “admin”.
You can add an extra layer of security by creating a new user with a unique name that has admin privileges, and then disabling the default admin account.
You can do this by going to “Access Control” > “Add” > “Add New User.” In the “Add New User” screen, input your unique username, and then give a strong password that contains a mix of alphanumeric and special characters. ASUSTOR let’s you know when you have a strong password.
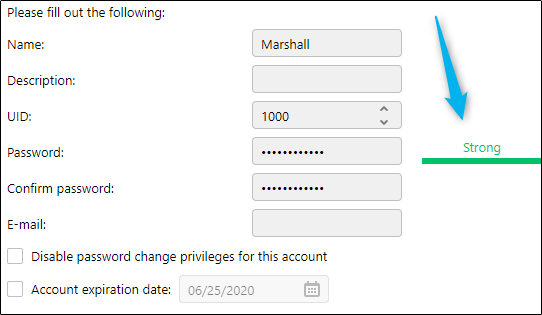
On the next page, give admin rights to the new user account.

Once set up, log out and switch to the new admin account you just created. Head back to the Access Control panel, select the default admin account, click “Edit,” select “Disable this Account,” and then click “Ok.”
Use Two-factor Authentication
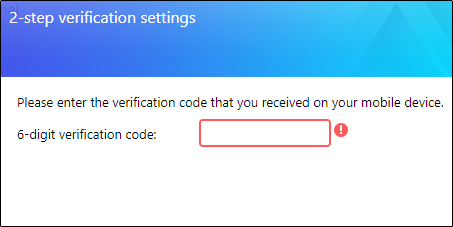
Two-factor authentication adds yet another layer of protection to the login process. If someone were to actually somehow get their hands on your login credentials, they’d still need to input the authentication code sent to the respective device. This makes two-factor authentication an extremely difficult security wall to break through.
Even better, ASUSTOR requires you to download and install an authenticator app, such as Google Authenticator, to your mobile device. This is more secure than using SMS, as SMS messages can be intercepted through phone networks, or threat actors can do what’s known as a SIM swap. And while you’re not 100% safe using an authenticator app, it’s better than the alternative.
The process for enabling two-factor authentication on your ASUSTOR NAS is pretty simple. To get started, head over to your personal settings and check the box next to “Enable 2-step Verification.”
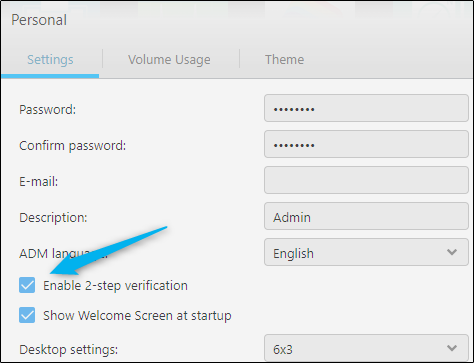
The wizard will carry you through the rest of the process. Make sure you have your mobile device with a QR code scanner handy.
Block Unauthorized IPs
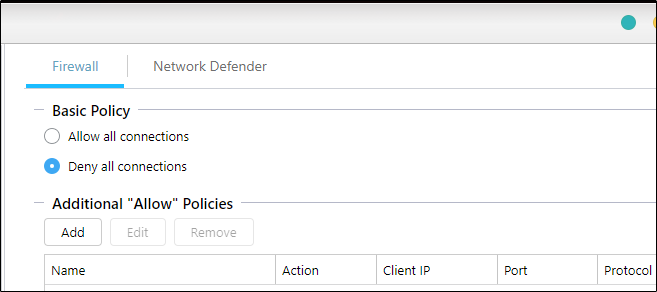
Writer and network/cyber security expert, Dave McKay, eloquently defines a firewall as a monitored and controlled boundary between your network and the rest of the internet, with its purpose being to keep cyber threats and malicious or unwanted network traffic out of your network. In other words, your firewall is your first line of defense.
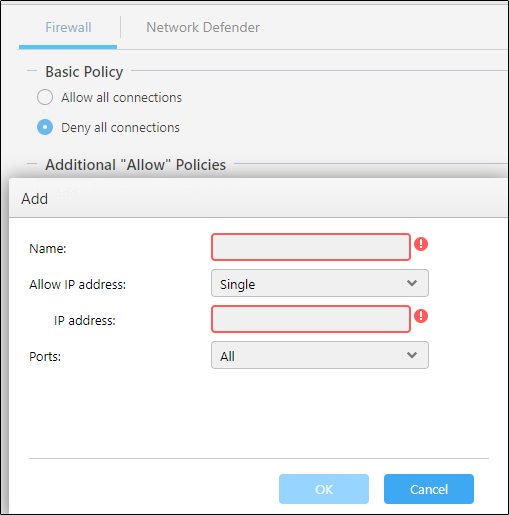
ASUSTOR provides a software called ADM Defender, which comes with a firewall (and Network Defender), allowing you to block specific IP addresses from accessing the NAS or allow only certain IP addresses to access the NAS.
Navigate to the “ADM Defender” tab of your NAS settings to start configuring your firewall.
Enable Hypertext Transfer Protocol Secure (HTTPS)
HTTPS is HTTP with Secure Sockets Layer (SSL)/Transport Layer Security (TLS). You should always use HTTPS when possible–it encrypts the requests and responses that HTTP doesn’t. There’s a reason it’s so dangerous to use HTTP sites if you’re inputting credit card details or other personal information.
Related: What is Formjacking?
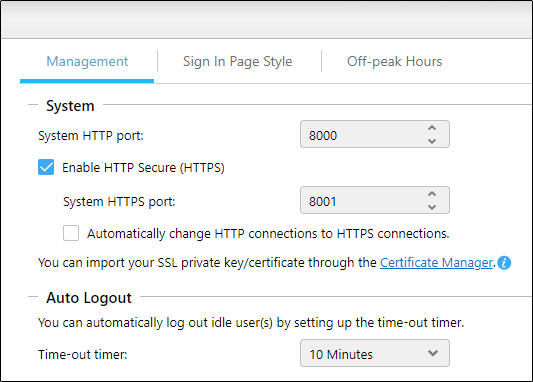
To enable HTTPS on your ASUSTOR NAS, navigate to “General” > “Management” from the NAS settings menu. Here, you can enable HTTPS and automatically change HTTP connections to HTTPS connections. Keep in mind you’ll need to import your SSL private key/certificate through their Certificate Manager.
Update Your Firmware
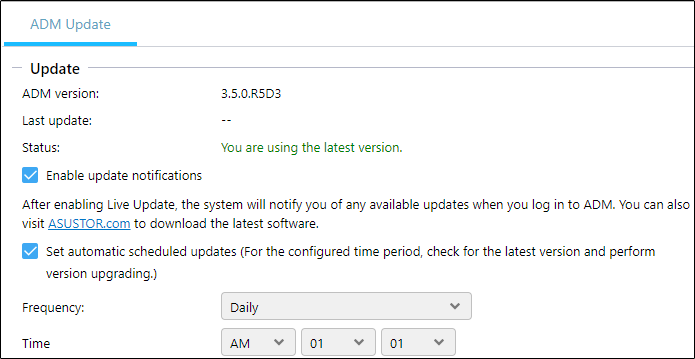
Always keep your NAS up to date. As time goes on and security vulnerabilities are brought to light, ASUSTOR will provide security patches for said vulnerabilities via firmware updates. You can manually update your machine or set automatic scheduled updates. Be sure to set the scheduled updates for a time when your NAS isn’t full throttle.
As expected, ASUSTOR also lists out their updates in their Release Notes. Give them a gander if you’re curious.
Frequently Create Snapshots of Your Data
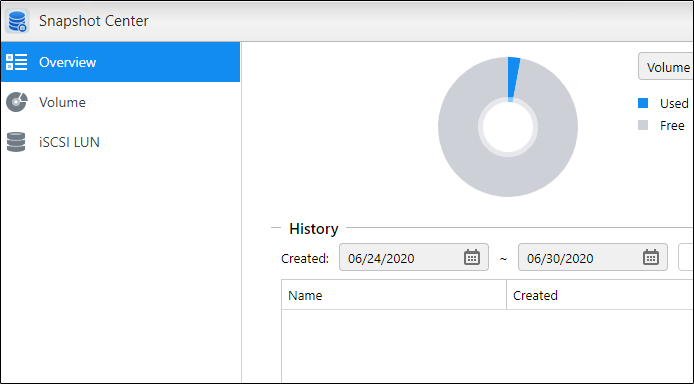
For the data-savvy folks out there, this is a no-brainer. Taking snapshots is a surefire way to protect your data. Even if your system gets infected with ransomware, you can always roll back to a previous state without paying the ransom. Of course, there’s always a chance that you lose any new changes to your data from the last snapshot to the point of infection, but it’s better than paying a ransom to a threat actor–in most cases.
One of the more basic features of a NAS is the ability to perform snapshots. ASUSTOR is no exception. You can set up scheduled snapshots (or do it manually) in the Snapshot Center. Schedule them frequently so that if you do get hit with ransomware, the data loss will be minimal when you roll back.
And as always, back up your data to multiple locations.
Be Vigilant
As we mentioned in the beginning of this article, basic cyber security hygiene is a must. Proper cyber security begins with you. In another article, we explain the three legs of cyber security:
- Technology
- IT governance
- Staff education
Replace “Staff education” with self-awareness if this is a NAS for personal use, but the point remains. Keep your tech up to date, don’t give people unnecessary access (even if not intentionally malicious, human error exists), and be aware of your own behavior. By following these rules, you can make your ASUSTOR NAS more secure.
The post How to Make Your ASUSTOR NAS More Secure appeared first on ITEnterpriser.
]]>The post How to Find Your ASUSTOR NAS appeared first on ITEnterpriser.
]]>Prerequisites
As you may have expected, there are a few things you need to do before you’re able to find your ASUSTOR NAS.
- Connect your NAS to a power supply, as well as the local network
- Install at least one HDD or SSD
- Download ASUSTOR Control Center to your Windows PC or Mac
Once you’ve satisfied these requirements, you’re ready to locate your NAS.
Find Your ASUSTOR NAS
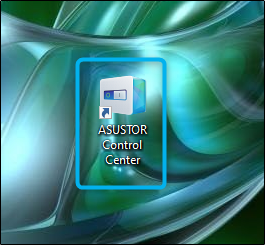
First, open the “ASUSTOR Control Center” app or your PC or Mac. You can do this by double-clicking the app icon that appears on your desktop after downloading.
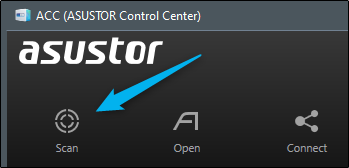
Next, select the “Scan” button in the top-left corner of the ASUSTOR Control Center window.
It will scan your local network for connected ASUSTOR NAS devices. Once the scan is complete, all ASUSTOR NAS devices on the network will appear in the list.
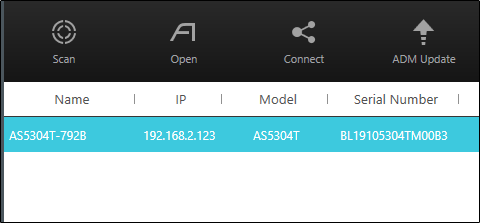
Double-click the NAS you’d like to connect to from the list and it will open in your default browser. Once in, bookmark the URL so that you don’t need to repeat these steps each time you want to access it.
The post How to Find Your ASUSTOR NAS appeared first on ITEnterpriser.
]]>